Admin Beginner
Module 1 - Salesforce Platform Basics
Salesforce is CRM (Customer Relationship Management) software. It stores your customer data, gives you processes to nurture prospective customers, and provides ways to collaborate with people you work with.
Platform building blocks -
The Salesforce Platform is the foundation for a suite of technologies that help you build apps and use prebuilt components to connect your teams around your customers. This portfolio of products and services is called Einstein 1. Einstein 1 is an integrated CRM platform that transforms companies by uniting their marketing, sales, commerce, service and IT teams with a single, shared customer view.
Here are just a few ways the Salesforce Platform can help you build apps and functionality for your business.
core Salesforce Platform - If you need to build a custom business application for your company or customer, the core Salesforce Platform makes it easy to develop a custom data model and application that works on desktop and mobile.
Heroku - If you need to build a customer-facing application where traffic could fluctuate unpredictably, the Heroku platform’s elastic scalability is just what you need.
Salesforce APIs - If you want to update data or integrate with other applications inside or outside of your organization, or manage customizations of your metadata, the Salesforce APIs can help you do that and much more.
Salesforce Einstein - If your organization needs a better way to predict sales or product success, or know how likely customers are to buy a certain product, the Salesforce Einstein suite of powerful artificial intelligence (AI) tools can help you gather unique data and insights to predict business outcomes.
Mobile SDK - If your organization needs a way to address a business need on the go, the Mobile SDK suite of technologies helps you develop native, HTML5, and hybrid apps for mobile devices that have the same security and reliability as the Salesforce app.
Let’s take a look at a page from the Dreamhouse app to define some of its important elements and how they relate to the database.
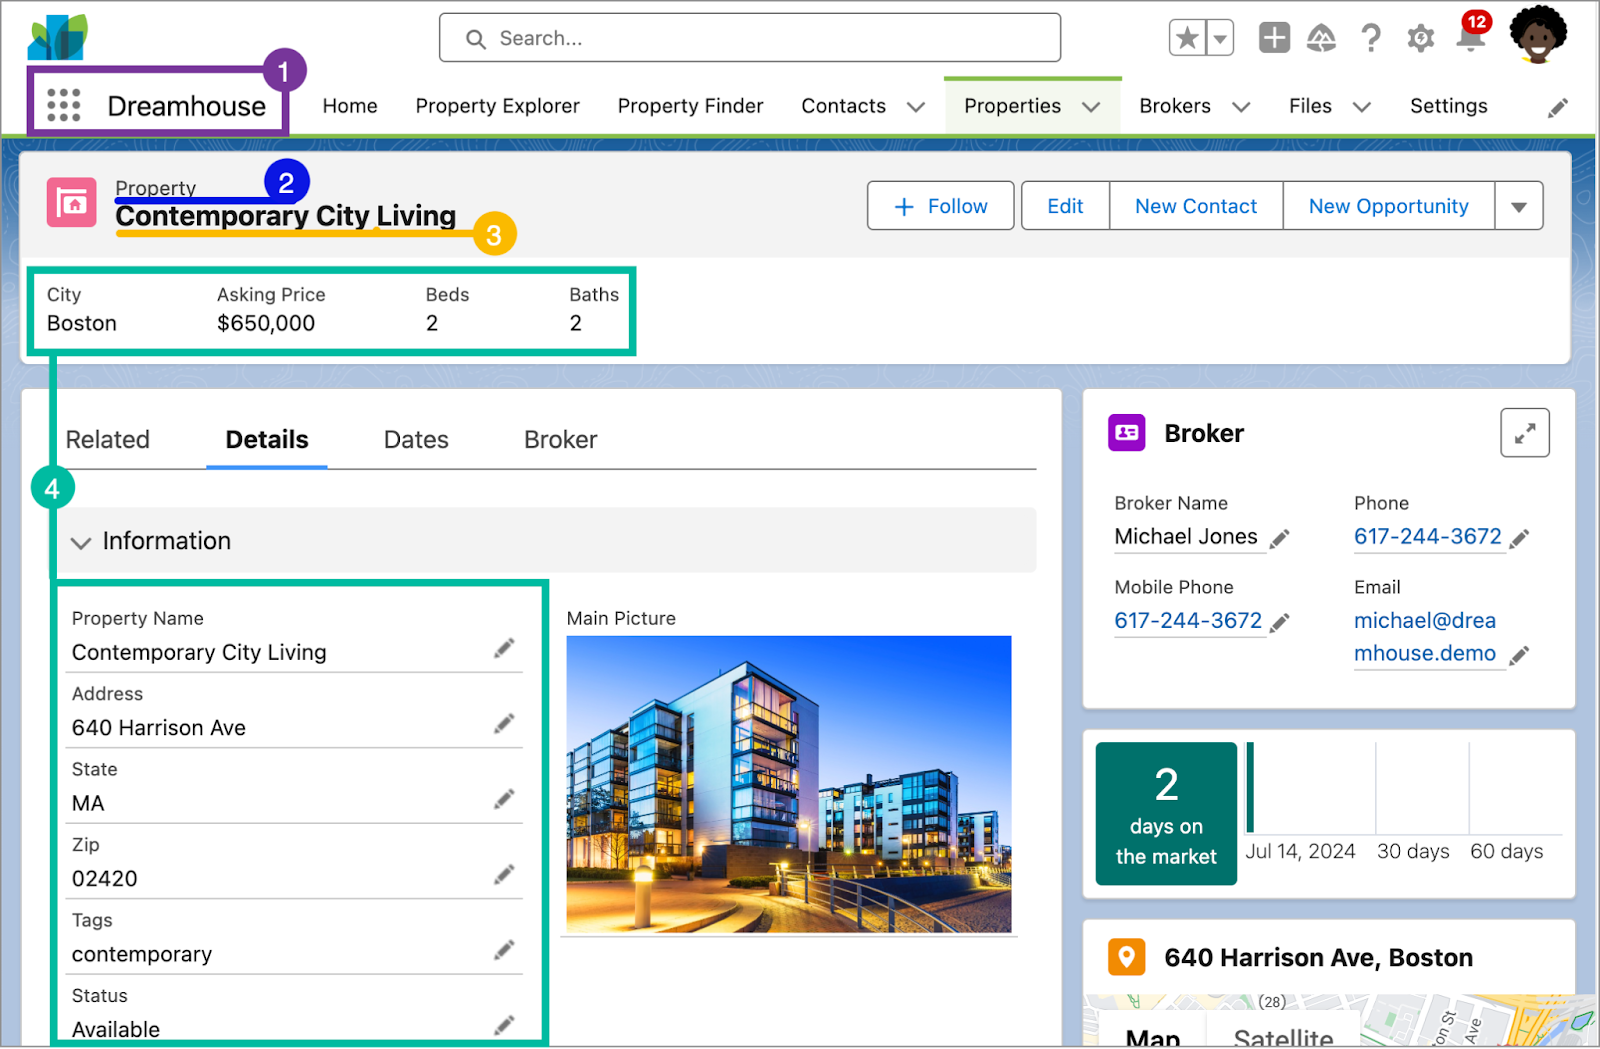
An app in Salesforce is a set of objects, fields, and other functionality that supports a business process. You can see which app you’re using and switch between apps using the App Launcher (
 ).
).Objects are tables in the Salesforce database that store a particular kind of information. There are standard objects like Accounts and Contacts and custom objects like the Property object you see in the graphic.
Records are rows in object database tables. Records are the actual data associated with an object. Here, the Contemporary City Living property is a record.
Fields are columns in object database tables. Both standard and custom objects have fields. On our Property object, we have fields like Address and Price.
Another important term that’s hard to capture in a picture is org. Org is short for organization, and it refers to a specific instance of Salesforce. The image here is taken from Dreamhouse’s org. Your company can have one or multiple orgs.
Unit 2 - Discover Use Cases for the Platform
High Impact, Low Effort Initiatives
Focus on automating repetitive tasks and streamlining manual processes.
Ideal early projects:
Heavy reliance on emails, spreadsheets, and local documents.
Time-consuming manual workflows.
Limited stakeholders involved.
Tools used:
Flow Builder: Create workflows to minimize errors and standardize processes.
Prompt Builder: Generate AI-driven emails or replies using customer data.
Q1: What makes the Salesforce platform ideal for tackling initial projects? A: The platform enables high impact, low effort solutions by automating manual processes and streamlining workflows. It allows organizations to achieve significant results quickly with tools like Flow Builder for automation and Prompt Builder for AI-driven tasks.
Q2: What are some characteristics of processes that are great candidates for early projects on the Salesforce platform? A: Processes with:
Heavy reliance on emails or spreadsheets.
Shared local documents.
Time-intensive manual steps.
Impact on limited departments.
Q3: What is Flow Builder, and how does it enhance efficiency? A: Flow Builder is a tool within Salesforce that enables the creation of automated workflows and screen flows without code. For instance, it can help ensure property listings are standardized, reduce missing information, and streamline data entry.
Q4: How does Prompt Builder enhance user productivity? A: Prompt Builder, part of the Einstein 1 Studio, allows the creation of AI-driven prompts that generate personalized content such as emails or customer replies. It helps automate communication based on customer data and preferences, saving time and increasing engagement.
Q5: How does Salesforce improve property listing workflows for Dreamhouse Realty? A: Salesforce allows Dreamhouse to create a custom Property Object and use Flow Builder to capture and standardize property details. This minimizes errors, ensures data consistency, and simplifies sharing property information with clients.
Q6: How can Salesforce streamline HR processes? A: By creating a custom HR app, the platform can:
List job openings and manage applications.
Automate reminders and equipment requests.
Track orientation plans and employee time off.
Integrate with the Salesforce mobile app for on-the-go management.
Q7: How can the platform help IT manage tickets effectively? A: By building an IT ticketing system on Salesforce, IT can:
Use flows to route tickets to the correct teams.
Create dashboards to analyze requests.
Automate confirmation emails for updates.
Build a knowledge base for common issues.
Q8: Can Salesforce be used outside of sales processes? Provide examples. A: Yes, Salesforce can be customized for multiple departments:
Finance: Budget and contract management.
Product: Warranty tracking and preproduction testing.
Supply Chain: Vendor management and logistics.
Operations: Asset tracking and M&A enablement.
Q9: How does the mobile app improve app usability? A: Apps built on Salesforce are accessible via the mobile app, enabling users to manage tasks like recruiting, onboarding, or ticket resolution anytime, anywhere, increasing productivity and flexibility.
Q10: How does the Salesforce platform utilize AI tools for innovation? A: Tools like Einstein 1 Studio and Prompt Builder allow businesses to integrate generative AI for tasks such as personalized email generation, activity tracking, and customer communication, driving efficiency and innovation.
Q11: What impact does generative AI have on cross-departmental collaboration? A: Generative AI streamlines communication, automates repetitive tasks, and provides data-driven insights, enabling departments like HR, Sales, and IT to collaborate more effectively while reducing manual effort.
Salesforce is a cloud company. Everything we offer resides in the trusted, multitenant cloud.
The Salesforce platform is the foundation of our services. It’s powered by metadata and made up of different parts, like low-code tools, workflow automation, artificial intelligence (AI), and robust APIs for development.
These are all connected to Data Cloud, a data engine designed for massive scale that is built into the platform, and is part of that metadata framework, so you can easily connect data and take action on it.
All our apps sit on top of the platform. Our prebuilt offerings like Sales Cloud and Marketing Cloud Engagement, along with apps you build using the platform, have consistent, powerful functionality.
Everything is integrated. Our platform technologies like predictive and generative AI and the development framework are built into everything we offer and everything you build, and can be used with conversational AI like Einstein Copilot, and in Slack.
Trust and multitenancy -
Trust and multitenancy go hand in hand. Despite the fact that you’re sharing space with other companies, you can trust Salesforce to keep your data secure.
Data Cloud -
Data Cloud is a hyperscale data engine that is natively built into the Salesforce platform, and can be used all across it. It’s not a traditional database, but rather a data lakehouse.
Metadata -
metadata is data about data.
API -
application programming interface (API) allows different pieces of software to connect to each other and exchange information.
Interview-Style Questions and Answers on Salesforce Architecture
General Architecture Questions
Q1: What is Salesforce's architecture, and how does it work? A: Salesforce's architecture is based on a trusted, multitenant cloud powered by metadata. It integrates tools like low-code solutions, workflow automation, AI, and robust APIs, all connected to the Data Cloud. This structure allows for scalable, secure, and efficient customization and development.
Q2: Why is Salesforce referred to as a "multitenant cloud"? A: Salesforce uses a multitenant architecture where multiple organizations share the same infrastructure and core services, but each has its own secure, isolated space. This ensures consistent updates and features without requiring individual installations or maintenance.
Q4: What role does the Einstein Trust Layer play in AI workflows? A: The Einstein Trust Layer adds security guardrails, ensuring that generative AI workflows can use customer and company data without compromising privacy or governance.
Data and Metadata Questions
Q5: What is the Salesforce Data Cloud, and how does it differ from traditional databases? A: The Data Cloud is a data lakehouse that handles structured and unstructured data, harmonizing it for use across Salesforce tools. Unlike traditional databases, it connects external data sources without duplication and powers predictive and generative AI, enabling real-time, actionable insights.
Q6: What is metadata, and why is it important in Salesforce? A: Metadata is data about data, like fields, layouts, and security settings. It defines the structure of your Salesforce org and allows for fast creation, storage, and retrieval of configurations, helping to maintain consistency and speed in customization. In a Property object, metadata includes fields like address, price, and number of bedrooms. Even if the field values are empty, the metadata (structure) remains, guiding the collection and use of data in the organization.
API and Integration Questions
Q8: What is an API, and how does it enhance Salesforce's flexibility? A: An API (Application Programming Interface) enables software systems to connect and exchange information. In Salesforce, APIs allow seamless access to data and metadata, enabling integration with external applications and custom solutions. When you create a custom object or field, Salesforce generates an API name that acts as an access point for retrieving data and metadata. For example, a contact's Name field can be reused across apps, pages, or email templates using its API name.
Use Case-Specific Questions
Q10: How can the Data Cloud improve operations for companies like Dreamhouse Realty? A: The Data Cloud helps by:
Surfacing web interactions in real-time for brokers.
Providing broader, more accurate customer profiles for service agents.
Enabling AI-driven workflows that standardize and automate processes.
Q11: How can APIs support business innovation in Salesforce? A: APIs enable businesses to go beyond standard functionality by allowing integration with other systems, building custom applications, and automating data exchanges. This flexibility supports creative and unique solutions tailored to organizational needs.
Key Terminology Questions
Q12: What are the five key terms to understand in Salesforce architecture? A: The five key terms are:
Trust: Salesforce's priority to ensure data security and transparency.
Multitenancy: Shared infrastructure for cost-effective scalability.
Data: The information stored in Salesforce.
Metadata: The structural framework for data and configurations.
API: The mechanism for connecting and interacting with external systems.
Q13: Why is multitenancy beneficial to Salesforce users? A: Multitenancy ensures all users, regardless of company size, access the same computing power, data storage, and automatic updates without needing to manage hardware or software installations.
Unit 4 - Navigate Setup
Let’s get familiar with the Setup area.
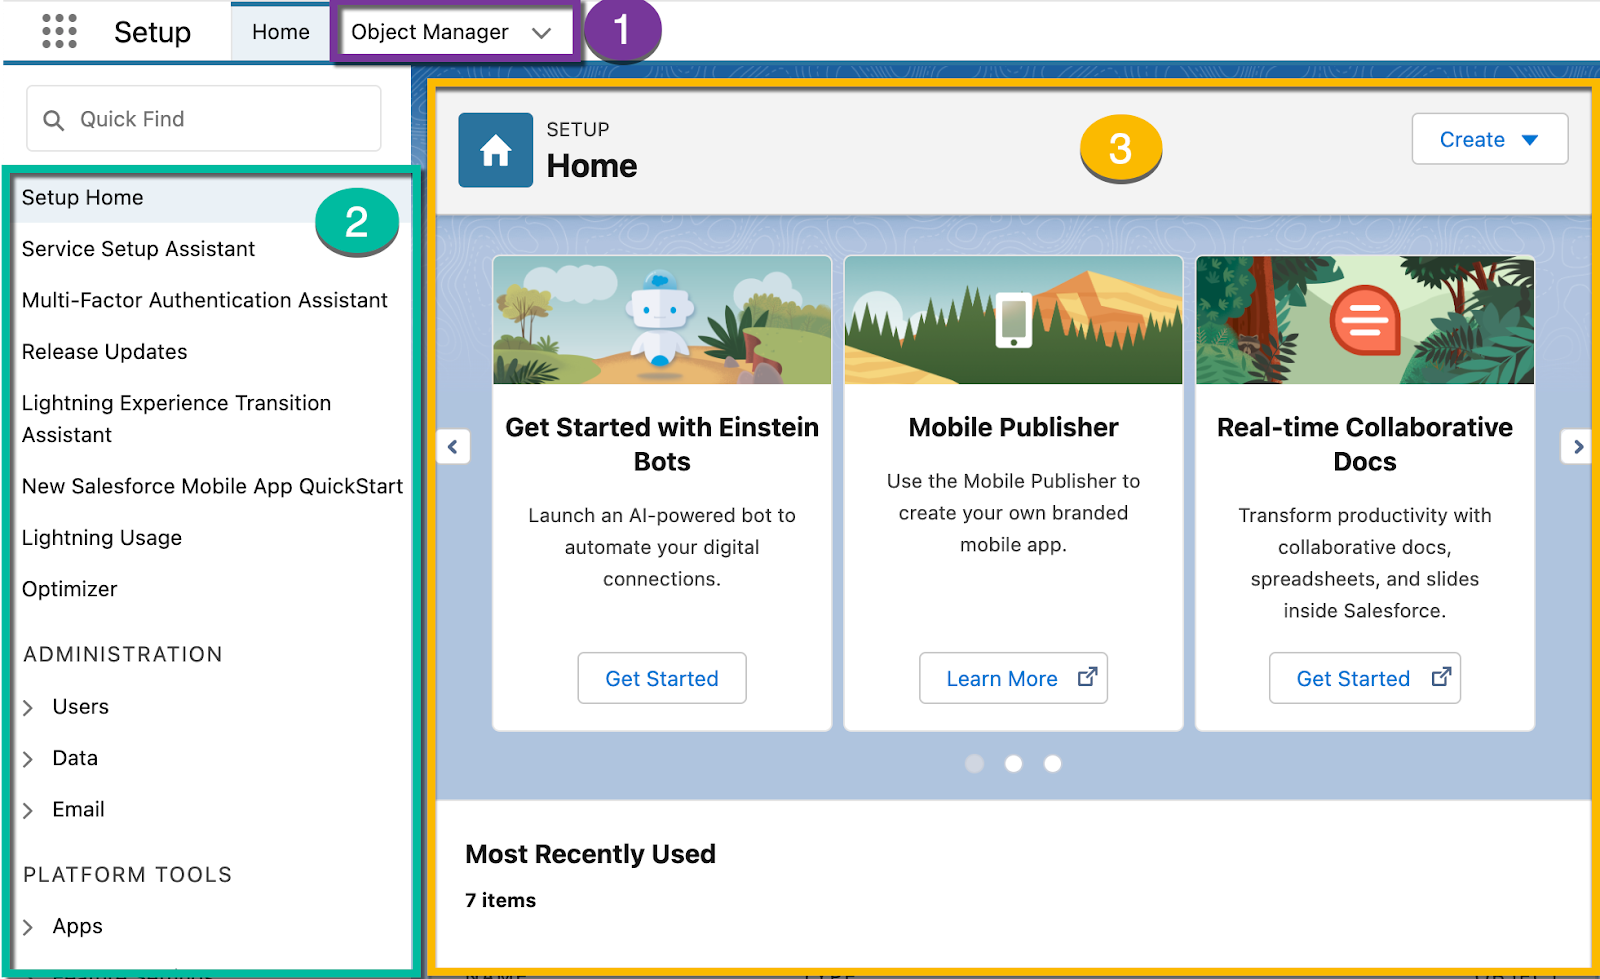
Object Manager: Object Manager is where you can view and customize standard and custom objects in your org.
Setup Menu: The menu gives you quick links to a collection of pages that let you do everything from managing your users to modifying security settings.
Main Window: We’re showing you the Setup home page, but this is where you can see whatever it is you’re trying to work on.
There are three main categories in the Setup menu: Administration, Platform Tools, and Settings. Let’s take a look at what’s available.
Administration: The Administration category is where you manage your users and data. You can do things like add users, change permissions, import and export data, and create email templates.
Platform Tools: You do most of your customization in Platform Tools. You can view and manage your data model, create apps, modify the user interface, and deploy new features to your users. If you decide to try your hand at programmatic development, Platform Tools is where you manage your code as well.
Settings: Finally, Settings is where you manage your company information and org security. You can do things like add business hours, change your locale, and view your org’s history.
Software Developer Interview Questions and Answers on Salesforce Setup
General Setup Navigation
Q1: What is the primary purpose of the Salesforce Setup area? A: The Setup area is the central location in Salesforce for customizing, configuring, and supporting your organization. It includes tools for managing users, customizing objects, configuring security, and deploying new features.
Q2: How can you access the Setup area in Salesforce? A: You can access the Setup area from any page in Salesforce by clicking the gear icon in the top-right corner and selecting Setup.
Setup vs. Non-Setup Context in Salesforce
Setup Context
Focus: Metadata and org configurations.
Examples: Managing user profiles, creating custom objects, setting up workflows, or modifying security settings.
Access: Requires admin privileges; accessible via the Setup menu.
Purpose: Modifies the structure and behavior of the Salesforce org.
Non-Setup Context
Focus: Business data and processes.
Examples: CRUD operations, executing SOQL/SOSL queries, managing leads, or approving requests.
Access: Performed by end users with appropriate permissions.
Purpose: Handles day-to-day business operations.
Key Differences
Purpose
Configure org metadata
Manage and process business data
Access
Admin privileges required
End-user level permissions
Entry Point
Setup menu or Metadata API
Salesforce apps or APIs
Execution Focus
Metadata changes
Business logic and CRUD actions
Key Elements of the Setup Area
Q3: What are the three main components visible on the Setup home page? A: The three main components are:
Object Manager: For viewing and customizing standard and custom objects.
Setup Menu: Contains links to various pages for managing users, security, and customization.
Main Window: Displays the selected page or feature being worked on.
Q4: How does the Quick Find feature help in the Setup menu? A: The Quick Find box allows you to search for specific pages or settings in the Setup menu, making it easier to navigate directly to the required functionality.
Setup Menu Categories
Q5: What are the three categories of the Setup menu, and what can you manage in each? A:
Administration: Manage users, permissions, and data (e.g., adding users, importing/exporting data).
Platform Tools: Customize the org, manage the data model, create apps, and manage code.
Settings: Configure company information, manage security settings, and track system history.
Q6: Where would you go to reset a user's password or deactivate a user? A: Navigate to the Users page under the Administration category in the Setup menu.
Top Setup Pages
Q7: What is the purpose of the "Company Information" page in Setup? A: The Company Information page provides an at-a-glance view of your organization, including the org ID, licensing information, and limits like data and file usage.
Q8: What can you do on the "Profiles" page? A: The Profiles page allows you to manage user permissions, control access to data and features, and create custom profiles for specific roles.
Q9: How does the "View Setup Audit Trail" page assist in troubleshooting? A: The View Setup Audit Trail page displays a six-month history of changes made in the org, including who made the changes and when. It is useful for identifying and troubleshooting configuration issues.
Q10: Why is the "Login History" page important for security? A: The Login History page shows six months of login data, including dates, times, user details, IP addresses, and more. It helps in monitoring security and tracking system adoption.
Use Cases and Troubleshooting
Q11: If you need to add business hours or change your locale settings, where would you navigate in Setup? A: Navigate to the Settings category in the Setup menu to manage business hours and locale settings.
Q12: Where would you go to deploy new features or modify the user interface programmatically? A: Use the Platform Tools category in the Setup menu to manage these tasks.
Q13: What is the significance of the "Object Manager" in the Setup area for a developer? A: The Object Manager is essential for developers to customize standard and custom objects, including managing fields, relationships, and layouts.
Developer-Specific Setup Questions
Q14: How can a developer track changes to Salesforce metadata configurations? A: Developers can use the View Setup Audit Trail to track changes, which helps in identifying modifications to metadata configurations.
Q15: How does the Quick Find feature improve productivity for developers? A: Developers can use the Quick Find feature to quickly access specific tools, such as Apex Classes, Visualforce Pages, or permission sets, saving time in navigation.
Salesforce has a community of partners that use the flexibility of the Salesforce platform to build amazing apps and other solutions that anyone can use. These offerings are available (some for free, some at a cost) for installation on AppExchange.

Salesforce Developer Interview Questions and Answers on AppExchange
General Overview of AppExchange
Q1: What is AppExchange in Salesforce? A: AppExchange is Salesforce’s marketplace for apps, components, and solutions built by Salesforce partners. These can be installed to extend the functionality of Salesforce, addressing various business needs. some apps on AppExchange are free, while others require a purchase.
Developing an AppExchange Strategy
Q3: Why is it important to have an AppExchange strategy? A: An AppExchange strategy ensures that you select high-value apps without duplicating functionality or wasting resources on unnecessary solutions.
Q4: What steps should you follow to create a successful AppExchange strategy? A:
Identify Salesforce-using departments as stakeholders.
Research apps that meet stakeholder requirements by discussing their business needs.
Test the app in a non-production environment like a sandbox or Developer Edition org.
Evaluate the tested apps for feature gaps or conflicts with existing customizations.
Deploy the app in the production environment and provide training/documentation to users.
Q5: What are some key questions to ask stakeholders when identifying their AppExchange needs? A:
What business problem are you trying to solve?
What are your current pain points?
How many users need this app?
What’s your budget?
What’s your timeline?
Installing an App from AppExchange
Q6: What are the two key decisions to make during the app installation process? A:
Where to install the app: Typically, apps are first installed in a sandbox or Developer Edition org to test for conflicts before deploying to production.
Who gets app permissions: You can assign permissions to admins only, all users, or specific profiles, depending on the app’s purpose.
Q7: How can you find an installed app in Salesforce? A:
Navigate to Setup and use the Quick Find box to search for Installed Packages.
Select the name of the package you installed.
Click View Components to see the details, such as custom fields, objects, and Apex classes.
Testing and Deployment Best Practices
Q8: Why is it recommended to install apps in a sandbox before production? A: Installing in a sandbox helps identify potential conflicts with existing configurations or customizations, ensuring the production environment remains stable.
Q9: What is the significance of the Package Details page after app installation? A: The Package Details page displays all components of the app, including custom fields, objects, and Apex classes. This information is crucial for identifying conflicts with existing customizations.
Customizing and Learning from AppExchange Apps
Q10: What are Salesforce Labs apps, and why are they useful? A: Salesforce Labs apps are free, open-source apps provided by Salesforce. They can be customized as needed, and their code can be analyzed to learn how the platform works.
Q11: How can you customize an AppExchange app after installation? A: You can modify components like custom fields, objects, and workflows based on your requirements. For open-source apps (e.g., Salesforce Labs apps), you can also edit the underlying code.
Practical Scenarios
Q12: How would you resolve a conflict between an AppExchange app and existing customizations? A: Use the sandbox environment to test the app. Review its components on the Package Details page to identify conflicts. Adjust naming conventions, dependencies, or customizations to resolve the issue.
Q13: If a department requests an app for SMS integration with Marketing Cloud, how would you proceed? A:
Discuss the department's specific requirements (e.g., number of users, budget).
Research SMS apps on AppExchange.
Install the shortlisted app in a sandbox environment for testing.
Evaluate feedback from stakeholders after testing.
Deploy the chosen app in the production environment.
Advanced Topics
Q14: How can developers learn from AppExchange apps? A: Developers can explore open-source apps from Salesforce Labs to study their architecture, understand platform capabilities, and enhance their coding skills.
Q15: What role does Apex play in AppExchange apps? A: Many AppExchange apps include Apex classes for custom logic. Developers can review and modify these classes if necessary to fit specific business needs.
These questions and answers cover critical aspects of AppExchange relevant to Salesforce developers, including strategic planning, technical considerations, and practical deployment scenarios.
Module 2 - Data Modeling
Data Model -
A data model is more or less what it sounds like. It’s a way to model what database tables look like in a way that makes sense to humans.
In Salesforce CRM, we think about database tables as objects, we think about columns as fields, and rows as records. So instead of an account spreadsheet or table, we have an Account object with fields and a bunch of identically structured records.
Objects -
Salesforce supports several different types of objects. There are standard objects, custom objects, external objects, platform events, and BigObjects.
Standard objects are objects that are included with Salesforce. Common business objects like Account, Contact, Lead, and Opportunity are all standard objects.
Custom objects are objects that you create to store information that’s specific to your company or industry. For DreamHouse, D’Angelo wants to build a custom Property object that stores information about the homes his company is selling.
Objects are containers for your information, but they also give you special functionality. For example, when you create a custom object, the platform automatically builds things like the page layout for the user interface.
Create a Custom Object
Click the gear icon
 at the top of the page and launch setup.
 Click the Object Manager tab.
Click Create | Custom Object in the top-right corner.
For Label, enter Property. Notice that the Object Name and Record Name fields auto-fill.
For Plural Label, enter Properties.
Prior to saving the custom object, scroll to the bottom of the page and select the checkbox Launch New Custom Tab Wizard after saving this custom object.
Leave the rest of the values as default and click Save.
On the New Custom Object Tab page, click the Tab Style field and select a style you like. The style sets the icon to display in the UI for the object.
Click Next, Next, and Save.
Create a Custom Field
From Setup, go to Object Manager | Property.
In the sidebar, click Fields & Relationships. Notice that there are already some fields there. There’s a name field and some of the system fields you learned about earlier.
Click New in the top right.
For data type, select Currency.
Click Next.
Fill out the following: Field Label: Price and Description: The listed sale price of the home.
Check the Required box.
Click Next, Next again, and then Save.
You’ll see your new Price field in the list of Property fields. In the Field Name column, notice that it says Price__c. The “__c” part is an easy way to tell that a particular field is a custom field.
Create a Record -
From the App Launcher (
 in the navigation bar), find and select Sales.
 Click the Properties tab in the navigation bar. If you don’t see it, look under the More dropdown.
Click New in the top corner.
Enter a name and price for the property and click Save.
You’ll see something like the following.

Object relationships are a special field type that connects two objects together. There are two main types of object relationships: lookup and master-detail.
Lookup Relationship - A lookup relationship essentially links two objects together so that you can “look up” one object from the related items on another object.
Lookup relationships can be one-to-one or one-to-many. The Account to Contact relationship is one-to-many because a single account can have many related contacts.
Master-Detail Relationships -
While lookup relationships are fairly casual, master-detail relationships are a bit tighter. In this type of relationship, one object is the master and another is the detail. The master object controls certain behaviors of the detail object, like who can view the detail’s data.
With a master-detail relationship between Property and Offer, you can delete the property and all its associated offers from your system.
a third relationship type called a hierarchical relationship. Hierarchical relationships are a special type of lookup relationship. The main difference between the two is that hierarchical relationships are only available on the User object. You can use them for things like creating management chains between users.
Example -
To start, create a custom object called Favorite and add a field to the object.
Click the Object Manager tab.
Click Create | Custom Object in the top-right corner.
For Label, enter
Favorite.For Plural Label, enter
Favorites.Check the box for Launch New Custom Tab Wizard after saving this custom object.
Leave the rest of the values as default and click Save.
On the New Custom Object Tab page, click the Tab Style field and select a style you like.
Click Next, Next, and Save.
Create a Lookup Relationship
Next, create two custom relationship fields on the Favorite object. First, create a lookup relationship that lists the users who select Favorite for a property.
From Setup, go to Object Manager | Favorite.
On the sidebar, click Fields & Relationships.
Click New.
Choose Lookup Relationship and click Next.
For Related To, choose Contact. For the purposes of DreamHouse, contacts represent potential home buyers.
Click Next.
For Field Name, enter Contact, then click Next.
Click Next, Next, Next, and Save.
Create a Master-Detail Relationship
Now, create a second relationship field. You want a master-detail relationship where Property is the master and Favorite is the detail.
On the Object Manager page for the custom object, click Fields & Relationships.
Click New.
Select Master-Detail Relationship and click Next.
For Related To, choose Property.
Click Next.
For Field Name, enter
Propertyand click Next.Click Next, Next, and Save.
Now, if you look at a Property record, you’ll see Favorites listed in the Related tab.
Add a favorite property
Next, take a look at how to view favorite properties.
From the App Launcher
 find and select Sales.
Click the Properties tab in the navigation bar. If you don’t see it, look under the More dropdown.
Click the name of a Property record.
Click Related. You’ll see Favorites (0) in the Related tab.
Click New.
Enter a name for Favorite Name, then click Save.
Unit 3 - Work with Schema Builder -
Schema Builder is a tool that lets you visualize and edit your data model. It’s useful for designing and understanding complex data models.
From Setup, search for and click Schema Builder in the Quick Find box.
In the left panel, click Clear All.
Check Contact, Favorite, Offer, and Property. You should have the Favorite object from the previous unit, and the Offer and Property objects from the previous challenges.
Click Auto-Layout.

create objects using Schema Builder
In the left sidebar, click the Elements tab.
Click Object and drag it onto the canvas.
Enter information about your object. You can make it whatever you want!
Click Save.
Creating fields with Schema Builder is just like creating objects.
From the Elements tab, choose a field type and drag it onto the object you just created. Notice that you can create relationship fields, formula fields, and normal fields in Schema Builder.
Fill out the details about your new field.
Click Save.
Module 3 - Data Management
Unit 1 - Import Data
You can easily import external data into Salesforce. Supported data sources include any program that can save data in the comma delimited text format (.csv). Salesforce offers two main methods for importing data.
Data Import Wizard—this tool, accessible through the Setup menu, lets you import data in common standard objects, such as contacts, leads, accounts, as well as data in custom objects. It can import up to 50,000 records at a time. It provides a simple interface to specify the configuration parameters, data sources, and the field mappings that map the field names in your import file with the field names in Salesforce.
Data Loader—this is a client application that can import up to 150 million records at a time, of any data type, either from files or a database connection. It can be operated either through the user interface or the command line. In the latter case, you need to specify data sources, field mappings, and other parameters via configuration files. This makes it possible to automate the import process, using API calls.
Start the wizard.
From Setup, enter Data Import Wizard in the Quick Find box, then select Data Import Wizard.
Review the information provided on the welcome page, then click Launch Wizard!
Choose the data that you want to import.
To import accounts, contacts, leads, solutions, person accounts, or campaign members, click Standard Objects. To import custom objects, click Custom Objects.
Specify whether you want to add new records to Salesforce, update existing records, or add and update records simultaneously.
Specify matching and other criteria as necessary. Hover over the question marks for more information about each option.
Specify the file that contains your data. You can specify your data file by dragging the CSV to the upload area of the page or by clicking the CSV category you’re using and then navigating to and selecting the file.
Choose a character encoding method for your file. Most users can accept the default character encoding.
Click Next.
Map your data fields to Salesforce data fields. The Data Import Wizard tries to map as many of your data fields as possible to standard Salesforce data fields. If Salesforce can’t automatically map fields, however, you do it manually. Unmapped fields are not imported into Salesforce. To see a list of standard Salesforce data fields, from Setup, at the top of the page, click Object Manager. Click the object whose fields you’re interested in, and click Fields & Relationships. For example, if you want to see a list of standard Salesforce fields for leads, click Object Manager | Lead | Fields & Relationships.
Scan the list of mapped data fields and locate any unmapped fields.
Click Map to the left of each unmapped field.
In the Map Your Field dialog box, choose the Salesforce fields you want to map to and click Map. The Map Your Field dialog box also gives you the option of saving data from unmapped fields in a general notes field for accounts and contacts. To do so, choose Account Note or Contact Note from the Map To drop-down list and click Map.
To change mappings that Salesforce performed automatically, click Change to the left of the appropriate field, then choose the Salesforce fields you want to map to and click Map.
Click Next.
Review and start your import.
Review your import information on the Review page. If you still have unmapped fields that you want to import, click Previous to return to the previous page and specify your mappings.
Click Start Import.
Check import status. From Setup, enter “Bulk Data Load Jobs” in the Quick Find box, then select Bulk Data Load Jobs. The user who starts the data import receives a status email when the import is completed.
Unit 2 - Export Data
You can easily export data from Salesforce, either manually or on an automatic schedule. The data is exported as a set of comma-separated values (CSV) files. Data export tools provide a convenient way to obtain a copy of your Salesforce data, either for backup or for importing into a different system.
Salesforce offers two main methods for exporting data.
Data Export Service—an in-browser service, accessible through the Setup menu. It allows you to export data manually once every 7 days (for weekly export) or 29 days (for monthly export). You can also export data automatically at weekly or monthly intervals. Weekly exports are available in Enterprise, Performance, and Unlimited Editions. In Professional Edition and Developer Edition, you can generate backup files only every 29 days, or automatically at monthly intervals only.
Data Loader—a client application that you must install separately. It can be operated either through the user interface or the command line. The latter option is useful if you want to automate the export process, or use APIs to integrate with another system.
From Setup, enter Data Export in the Quick Find box, then select Data Export and Export Now or Schedule Export.
The Export Now option prepares your files for export immediately. This option is only available if enough time has passed since your last export.
The Schedule Export option allows you to schedule the export process to run at monthly intervals.
Select the desired encoding for your export file.
If you want images, documents, attachments, and so on included in your data, select the appropriate options.
Select Replace carriage returns with spaces to have spaces instead of carriage returns or line breaks in your export files. This is useful if you plan to use your export files for importing or other integrations.
If you're scheduling your export, select the frequency (only available for organizations with monthly exports), start and end dates, and time of day for your scheduled export.
Under Exported Data, select the types of data to include in your export. We recommend that you select Include all data if you’re not familiar with the terminology used for some of the types of data.
Click Start Export or Save. Salesforce creates a zip archive of CSV files and emails you when it's ready. Exports will complete as soon as possible. However, we can't guarantee the date and time the export will complete. Large exports are broken up into multiple files. Follow the link in the email or click Data Export to download the zip file. Zip files are deleted 48 hours after the email is sent.
Module 4 - Lightning Experience Customization
Unit 1 - Set Up Your Org
Business Value of Custom Objects and Fields:
Custom objects and fields allow organizations to store data specific to their business needs.
Example: Ursa Major Solar uses custom objects to track energy audits.
create the custom Energy Audit object.
From the Object Manager in Setup, click Create | Custom Object.
Enter
Energy Auditas the label, andEnergy Auditsas the plural label.Select the box to indicate that it starts with a vowel sound.
In the Search Status section, select Allow Search.
Select Launch New Custom Tab Wizard after saving this custom object. You’ll see why in a minute.
Leave the rest of the values as they are, and click Save. Easy peasy, right?
create the custom object tab
Creating a custom tab for a custom object is a great way to make it easily accessible to users. This is a key step in configuring a custom object. Without a custom tab, you can’t add a custom object to an app.
Because you selected Launch New Custom Tab Wizard after saving this custom object, you’re right where you need to be, and the Energy Audit object is already selected.
Click the Tab Style lookup icon, and select the Sun color scheme and icon for the custom tab.
Click Next, then Next again.
Choose the custom apps that you want the new custom tab to be available in. For now, let’s make the tab visible for just the Sales users. Deselect Include Tab, and select only Sales (standard__LightningSales).
Click Save.
What’s a custom app?
It’s basically a set of fields, objects, permissions, and other functions assembled to support a business process. We find out more about that—and creating one—in the next unit.
Now you see the details of the Energy Audit custom object.
create a custom field
Click Fields & Relationships, then click New.
Choose Picklist as the field type and click Next.
Give it a label:
Type of Installation.Select Enter values, with each value separated by a new line.
Enter the picklist values, making sure to enter each one on a new line.
Rooftop
Carport
Ground mounted
Select Use first value as default value, and then click Next.

Leave the field-level security settings as they are, and click Next.
Leave Energy Audit Layout selected, and click Save.
That one field isn’t quite enough, though. The energy consultants also need to capture how much the customer is paying each month and what their monthly energy usage is. They also need a place to write up their audit evaluation. Let’s create a few more custom fields to let them do that. Unless indicated otherwise in the Parameters column, leave each field setting as-is.
Field Type
Label
Parameters
Lookup Relationship
Account
Related To: Account
Always require a value in this field.
Currency
Average Annual Electric Cost
Length: 16
Decimal Places: 2
Help Text: Annual cost per square foot.
Always require a value in this field.
Number
Annual Energy Usage (kWh)
Help Text: Usage per square foot.
Always require a value in this field.
Text Area (Long)
Audit Notes
# Visible Lines: 5
create a energy audit records
From the App Launcher
 , find and select Energy Audits.
Click New.
Add a record with these parameters.
Energy Audit Name:
Burlington evaluationType of Installation: Rooftop
Account: Burlington Textiles Corp of America Hint: Type
Burlingtoninto the Account field to see all accounts that match what you entered.Average Annual Electric Cost:
1.86Annual Energy Usage (kWh):
23These numbers seem small, but they’re cost and usage per square foot. For buildings with many thousands of square feet, that adds up to a lot of energy use and a big bill!
Click Save & New.
Let’s add a few more records to flesh things out.
Energy Audit Name
Type of Installation
Account
Average Annual Electric Cost
Annual Energy Usage (kWh)
UA Spring assessment
Carport
University of Arizona
2.19
30
GenePoint 5-year review
Rooftop
GenePoint
1.56
21
sForce Los Altos Hills campus
Ground mounted
sForce
1.77
25
Enable Feed Tracking
Turning on Feed Tracking enables Chatter feeds for an object.
From Setup, enter
Feed Trackingin the Quick Find box, then select Feed Tracking.Select Energy Audit from the object list.
Select
Enable Feed Tracking.Select all of the fields except Owner and All Related Objects.
Click Save.
Salesforce Developer Interview Questions and Answers: Custom Objects, Fields, and Org Setup
This article compiles common Salesforce developer interview questions based on setting up custom objects, fields, and features in Salesforce, with detailed answers. It includes examples, real-world scenarios, governor limits, and tricky questions.
1. What are custom objects in Salesforce, and why are they important?
Answer: Custom objects allow organizations to store data specific to their business needs beyond standard objects (e.g., Accounts, Contacts). They enable tailoring Salesforce to manage unique processes and workflows. Example: Ursa Major Solar uses a custom object called “Energy Audit” to track personalized energy assessments for customers.
2. How do you create a custom object in Salesforce?
Answer:
Navigate to Setup → Object Manager → Create → Custom Object.
Enter details like object label, plural label, and optional features (e.g., search indexing).
Save the custom object.
Optionally, launch the Custom Tab Wizard to make the object accessible in the app.
Key Points:
Always enable Allow Search for better usability.
Without a custom tab, objects can't be added to apps.
3. What are the governor limits and considerations for custom objects?
Answer:
Salesforce allows up to 3,000 custom objects per org (depends on the edition).
Ensure custom objects do not exceed storage limits for data and metadata.
Avoid creating too many custom objects that overlap with standard functionality to maintain performance.
Tricky Question: What happens if you delete a custom object?
Deleting a custom object permanently deletes its records and related metadata (fields, layouts).
4. How do you create and configure a custom tab for a custom object?
Answer:
Use the Tab Wizard after creating a custom object.
Choose a tab style (e.g., color, icon).
Select visibility for apps and user profiles.
Save the tab configuration.
Example: Ursa Major Solar created a "Sun" styled tab for their "Energy Audit" object, visible only to Sales users.
5. What are custom fields, and how do you create them?
Answer: Custom fields capture additional data for an object beyond standard fields. Steps to create:
Go to the object’s Fields & Relationships section → New Field.
Select the field type (e.g., Picklist, Number, Currency).
Enter details like label, values, help text, and security settings.
Save and add the field to relevant layouts.
Real-Time Example: Ursa Major Solar created custom fields for their “Energy Audit” object:
Picklist: Type of Installation (Rooftop, Carport, Ground Mounted)
Currency: Average Annual Electric Cost
Number: Annual Energy Usage (kWh)
Long Text: Audit Notes
6. What are the limitations of custom fields?
Answer:
A maximum of 800 custom fields per object (depending on edition).
Formula fields have a limit of 5,000 characters for formulas.
Roll-up summary fields only work on master-detail relationships.
Tricky Question: What happens when you change a custom field’s data type?
Conversions can result in data loss if types are incompatible (e.g., changing a picklist to a text field).
7. How do you enable Feed Tracking for a custom object? Why is it useful?
Answer: Feed Tracking allows tracking field changes and showing them in Chatter feeds. Steps:
Go to Setup → Feed Tracking.
Select the object (e.g., "Energy Audit").
Enable tracking and choose fields to track.
Save changes.
Real-Time Example: Ursa Major Solar tracks field changes in "Energy Audit" records for transparency and team updates.
8. How do you enter records into a custom object?
Answer: Records can be created manually or via imports. Steps to manually create a record:
Navigate to the object tab in the App Launcher.
Click New.
Enter field values and save.
Example: Energy Audit Record:
Name: Burlington evaluation
Type of Installation: Rooftop
Average Annual Electric Cost: $1.86/sq. ft.
Energy Usage: 23 kWh/sq. ft.
9. What are the best practices for designing custom objects and fields?
Answer:
Minimize unused fields and objects to avoid clutter.
Use field-level security to restrict sensitive data.
Use picklists and validation rules to ensure consistent data entry.
Avoid too many lookup relationships to prevent performance issues.
Governor Limit:
Maximum of 40 relationships per object (20 each for lookup and master-detail).
10. Tricky Questions and Knowledge Boosters
What is a Lookup Relationship, and when do you use it? Answer: A Lookup Relationship links two objects without enforcing dependency. Use it for loosely coupled objects, like associating an "Energy Audit" with an "Account."
How do you optimize reports on custom objects? Answer: Use indexed fields and avoid overly complex formulas. For example, filter Energy Audit reports by indexed fields like "Type of Installation."
What are dependent picklists, and how are they useful? Answer: Dependent picklists control available values in one picklist based on another's selection. Useful for narrowing data entry options (e.g., Installation Type based on Location Type).
What’s the difference between required fields and validation rules? Answer:
Required Fields: Enforced at the database level; must be filled.
Validation Rules: Conditional logic to ensure data integrity (e.g., if Installation = Rooftop, Building Height > 10 ft).
Unit 2 - Create and Customize Lightning Apps
Questions and Answers on Lightning Apps
1. What is a Lightning App in Salesforce?
Answer: A Lightning App is a collection of objects, tabs, and utilities grouped together to serve specific business functions. It allows users to navigate seamlessly and work efficiently within Salesforce, offering features like custom branding, navigation bar personalization, and a utility bar.
Real-Time Example: Custom App for Energy Consultations
Scenario: Maria, an admin at Ursa Major Solar, needs an app for tracking energy audits and product recommendations. Solution:
Create a Lightning app named Energy Consultations with custom branding.
Include tabs like Energy Audits, Accounts, and Contacts.
Add the app to consultants’ profiles for tailored access.
Test the app by navigating to it via the App Launcher.
2. What are the benefits of using Lightning Apps?
Answer:
Enhanced user efficiency with personalized navigation.
Custom branding with colors, logos, and themes.
Easy access to high-priority items for specific user roles.
Seamless switching between apps using the App Launcher.
3. What types of items can be included in a Lightning App?
Answer:
Standard objects (e.g., Accounts, Contacts).
Custom objects created in the org.
Visualforce tabs and Lightning component tabs.
Web tabs and utilities like Lightning Voice.
4. How can users switch between different Lightning Apps?
Answer: Users can switch between apps using the App Launcher in the Lightning Experience, which provides access to all enabled apps and items.
5. What is the role of the Lightning Experience App Manager?
Answer: The Lightning Experience App Manager is used to view, create, and manage Lightning Apps. It helps admins:
Create new Lightning Apps.
Identify apps visible in Lightning Experience.
Manage connected apps and Classic apps.
6. How do you create a new Lightning App?
Answer:
Go to Setup → Search App Manager → Click New Lightning App.
Use the wizard to set the app name, description, logo, colors, and navigation items.
Assign the app to user profiles and save.
7. What are two best practices for planning Lightning Apps?
Answer:
Engage with Users:
Gather feedback through Chatter, polls, or lunch sessions to understand user priorities.
Organize Navigation:
Place high-priority items at the top and keep less frequently used items accessible via the App Launcher.
8. What customization options are available for Lightning Apps?
Answer: Admins can customize:
App name and description.
Branding with logos and primary colors (e.g., hex color codes).
Navigation items and tab order.
Assignment to specific user profiles.
9. Can animated icons be used for Lightning Apps?
Answer: Yes, app icons for Lightning Apps can be animated GIFs, providing a unique and engaging branding experience.
10. What is the difference between Classic Apps and Lightning Apps in the App Manager?
Answer:
Classic Apps: Accessible in Salesforce Classic, but may lack Lightning features.
Lightning Apps: Fully functional in Lightning Experience with advanced navigation and branding capabilities.
What are some tricky questions related to Lightning Apps?
Q: Can a Lightning app support animated icons? A: Yes, Lightning app images can be animated GIFs.
Q: How do you ensure scalability when creating Lightning apps? A: Keep navigation streamlined, limit custom components to prevent performance degradation, and leverage the App Launcher for less-used items.
Q: How can Lightning apps improve productivity for users? A: By providing quick access to relevant records, customizable navigation, and utility tools, users can save time and focus on high-priority tasks.
Unit 3 - Create and Customize List Views
1. What is a List View in Salesforce, and how is it useful?
Answer: A List View in Salesforce displays filtered records of an object based on specified criteria. It helps users focus on specific subsets of data, making it easier to manage and analyze records efficiently.
2. How do you create a custom List View?
Answer: To create a custom List View:
Navigate to the object tab (e.g., Accounts) in the desired app.
Click List View Controls → New.
Name the list and choose its visibility (e.g., for all users or specific users).
Add filters via the Filters panel, specifying fields, operators, and values.
Save the list view for future access.
Example: Filter accounts where Type = Customer - Channel and Billing State = WA, OR, CA.
3. How can you customize the fields displayed in a List View?
Answer:
Open the List View and click List View Controls → Select Fields to Display.
Move unwanted fields (e.g., Phone) out of the Visible Fields area.
Add desired fields (e.g., Industry, Customer Priority) to the Visible Fields area.
Save the changes.
Can you customize fields in a List View? If yes, how?
Answer: Yes, fields in a List View can be customized:
Open the List View and click List View Controls → Select Fields to Display.
Add desired fields (e.g., Industry, Customer Priority) and remove irrelevant ones.
Save the changes.
Governor Rule:
Maximum of 15 fields can be displayed in a List View.
Tricky Question: Q: Can formula fields be used in List View filters? A: Yes, provided they are accessible through field-level security.
4. Can you sort records in a List View? If so, how?
Answer: Yes, records in a List View can be sorted.
Click the column header (e.g., Account Name) to sort by that field.
The arrow indicates the sort direction: ascending (up arrow) or descending (down arrow).
5. Is it possible to edit records directly in a List View?
Answer: Yes, you can edit records directly in an editable List View:
Hover over a field to see a pencil icon (editable) or a lock icon (non-editable).
Click the pencil icon to edit the field value.
6. How do you create a List View Chart, and why is it useful?
Answer: Steps to create a List View Chart:
Open the relevant List View (e.g., All Opportunities).
Click the List View Charts icon and then the gear icon.
Click New Chart and provide details:
Chart Name: e.g., Pipeline Total Value.
Chart Type: Donut, Vertical Bar, or Horizontal Bar.
Aggregate Type: Sum, Count, or Average.
Aggregate Field: Field to calculate (e.g., Amount).
Grouping Field: Field for chart segments (e.g., Account Name).
Save the chart.
Utility: Visualizes data from the List View, making trends or priorities easier to understand.
7. What are some limitations of List View Charts?
Answer:
Charts are tied to the object; they are not available for the Recently Viewed list view.
Users must have permission to view the data and list views for the chart to be accessible.
8. How can you manage List View sharing settings?
Answer:
Click List View Controls → Sharing Settings.
Adjust visibility to make the List View accessible to all users, specific users, or private to the creator.
9. What are the key considerations for developers when working with List Views?
Answer:
Ensure relevant fields are available for filtering and display.
Use proper filters to optimize performance and relevance.
Custom charts should align with business needs to add value.
Sharing settings must comply with organizational security and visibility rules.
What are the limitations of List Views?
Answer:
Maximum of 2,000 records displayed in a List View.
Cannot include fields from related objects in filters.
Inline editing is restricted for formula and read-only fields.
Charts cannot be created for Recently Viewed or Unfiltered List Views.
11. Can you edit records directly in a List View?
Answer: Yes, inline editing is supported for editable fields:
Hover over a field to see a pencil icon (editable) or lock icon (non-editable).
Click the pencil icon to edit the value.
Limitations:
Inline editing is disabled if filters include cross-object fields.
Not all fields (e.g., system fields) are editable.
Real-World Example: A sales rep updates the "Stage" field for multiple Opportunities directly in the List View to reflect current deal statuses.
12. How can users sort records in a List View?
Answer:
Click the column header (e.g., Account Name) to sort by that field.
The direction is indicated by the arrow: ascending (up arrow) or descending (down arrow).
Tricky Question: Q: Can List Views be sorted by related object fields? A: No, sorting is limited to fields directly available in the object.
Tricky Questions for Interviews
Q1: Can you create a List View for related objects like Contacts under Accounts? A: No, List Views work only for one object at a time. Use reports for related object data.
Q2: What happens if you exceed the 2,000-record limit in a List View? A: Only the first 2,000 records are displayed. Use additional filters to reduce the result set.
Q3: Can you use OR logic in List View filters? A: No, List Views support only AND logic for filters. Use reports for OR logic.
Q4: Are List View Charts visible to all users? A: Yes, if the List View itself is shared with those users.
1. What is a Compact Layout in Salesforce, and why is it important?
Answer: A Compact Layout in Salesforce defines the fields displayed in the highlights panel at the top of a record, in the expanded lookup card when hovering over a link, and in the activity details section of the activity timeline.
Importance:
Provides key record information at a glance.
Enhances productivity by displaying relevant fields prominently.
Optimizes record display for both desktop and mobile, especially for the Salesforce mobile app where space is limited.
2. How do Compact Layouts differ from Page Layouts?
Answer:
Compact Layouts control fields in the highlights panel, lookup cards, and mobile displays.
Page Layouts define the full layout of a record, including sections, fields, and related lists.
Compact layouts focus on key fields, while page layouts provide comprehensive record details.
3. What are the steps to create a Compact Layout in Salesforce?
Answer: To create a Compact Layout:
Navigate to Setup → Object Manager → Select the desired object (e.g., Energy Audit).
Open the Compact Layouts node.
Click New to create a new compact layout.
Add a label (e.g., Energy Audit Compact Layout).
Select and arrange the fields in the desired order (e.g., Energy Audit Name, Account, Annual Energy Usage (kWh)).
Save the layout.
To assign the layout as the primary compact layout:
Click Compact Layout Assignment → Edit Assignment.
Select the newly created compact layout.
Save the assignment.
4. Which fields should you prioritize in a Compact Layout?
Answer: Prioritize fields that:
Are critical for users to understand the record at a glance.
Provide actionable insights (e.g., status, owner, key metrics).
Align with the business process or workflow (e.g., Account Name, Industry, Rating).
5. How do Compact Layouts enhance the user experience in the Salesforce mobile app?
Answer: Compact Layouts optimize the display of key record information on mobile screens by:
Highlighting essential fields in a concise format.
Making records easily scannable for quick recognition and action.
Reducing clutter by focusing on high-priority fields.
6. What is the System Default Compact Layout, and when is it used?
Answer: The System Default Compact Layout is automatically assigned to custom objects upon creation.
It includes only one field: the object name.
It serves as a placeholder until a custom compact layout is created and assigned.
7. How do you assign a Compact Layout to an object?
Answer:
Go to Object Manager → Select the object.
Open Compact Layouts.
Click Compact Layout Assignment → Edit Assignment.
Select the desired compact layout.
Click Save.
8. Can Compact Layouts be customized for different user profiles?
Answer: No, Compact Layouts are assigned at the object level and are not customizable per user profile. However, different compact layouts can be created for various objects or record types to meet diverse user needs.
9. What are some best practices for configuring Compact Layouts?
Answer:
Limit the number of fields to essential information (4–6 fields typically).
Place the most critical field (e.g., record name or status) first for prominence.
Ensure field selection aligns with user workflows and needs.
Test the layout on both desktop and mobile to confirm usability.
Can you assign multiple Compact Layouts to an object?
Answer: Yes, you can create multiple compact layouts for an object, but only one compact layout can be assigned as the primary layout for a specific record type or profile at a time.
Common Tricky Questions for Interviews
Q: Can Compact Layouts override field-level security? A: No, Compact Layouts respect field-level security. If a user doesn’t have access to a field, it won’t appear in the compact layout.
Q: How do Compact Layouts behave with different record types? A: You can assign different compact layouts to different record types for the same object, tailoring the view to the needs of specific users.
Q: How does Salesforce determine which Compact Layout to display? A: Salesforce uses the following hierarchy to decide which compact layout to display:
Record Type (if assigned).
Object's primary compact layout.
Interview-Level Scenarios
Q: How would you handle a request to show only specific fields in the highlights panel for mobile and desktop users? A:
Create or modify the compact layout with the requested fields.
Assign it as the primary compact layout for the object.
Ensure fields are enabled for both desktop and mobile use.
Validate the compact layout by testing on desktop and Salesforce mobile app.
Q: What would you do if a field is missing in the highlights panel for some users? A:
Check the user's profile and permission sets for field-level security.
Confirm the field is included in the assigned compact layout.
Verify the record type assignment for the compact layout.
Extra Knowledge:
Order of Fields: The first field in a compact layout appears in bold at the top of the highlights panel.
Visibility Across Platforms: Compact layouts control the highlights panel in Lightning Experience and record displays in Salesforce mobile.
Advanced Use Case: For an Opportunity object, you can create a compact layout to highlight Stage, Amount, and Close Date for better deal tracking.
1. What is a Lightning Record Page in Salesforce?
Answer: A Lightning Record Page is a customizable interface for viewing and managing object records in Salesforce. It is a collection of components (e.g., related lists, buttons, and record details) organized into regions. Developers use tools like the Lightning App Builder and Page Layout Editor to personalize these pages.
2. What is the difference between the Lightning App Builder and the Page Layout Editor?
Answer:
Lightning App Builder:
Controls the structure of a page and the placement of components.
Enables dynamic customization with Dynamic Forms to show or hide fields based on criteria.
Used for creating custom Lightning pages for different apps or user profiles.
Page Layout Editor:
Manages related lists, buttons, quick actions, and links on a record page.
Configures the fields and actions displayed in the record details area.
3. How do you create a custom Lightning Record Page?
Answer:
Navigate to the object (e.g., Energy Audits) via the App Launcher.
Select a record and go to Setup → Edit Page to open the Lightning App Builder.
Update the page properties, such as the label and API name.
Use the Dynamic Forms migration wizard to separate fields into individual components.
Rearrange fields and components on the canvas.
Save the page.
4. What are Dynamic Forms, and why are they useful?
Answer: Dynamic Forms allow fields and sections to be added as independent components to a Lightning Record Page.
Advantages:
Greater control over field placement and visibility.
Tailored views for different users or scenarios by showing only relevant fields.
Improved page performance by reducing unnecessary data loading.
5. How do you add a Related List to a Lightning Record Page?
Answer:
Open the object in Object Manager → Page Layouts → [Page Layout Name].
Scroll to the Related Lists section.
Drag the desired related list (e.g., Files) from the palette to the section.
Save the changes.
6. How do you activate a Lightning Record Page for specific users?
Answer:
In the Lightning App Builder, click Activation.
Choose one of the following options:
Org Default: Makes the page the default for all users.
App Default: Sets the page as the default for specific apps.
App, Record Type, and Profile: Assigns the page based on a combination of app, record type, profile, and form factor (e.g., desktop or phone).
Use the wizard to assign the page to desired profiles (e.g., Sales Profile) and form factors.
Save the assignments.
7. How do you ensure a Lightning Record Page is responsive for desktop and mobile users?
Answer:
Assign the page to both desktop and phone form factors during activation.
Optimize the layout by testing components and fields for usability across devices.
8. How do you view and validate changes to a customized Lightning Record Page?
Answer:
Activate the page and assign it to relevant profiles and apps.
Navigate to the object via the App Launcher and open a record.
Refresh the page to see updates.
Check tabs like Details and Related to ensure proper field organization and related list visibility.
9. What are some best practices for customizing Lightning Record Pages?
Answer:
Use Dynamic Forms for better flexibility and performance.
Arrange components and fields logically to enhance user experience.
Limit the number of fields and related lists to avoid clutter.
Test pages on both desktop and mobile devices to ensure responsiveness.
Use targeted activation to assign pages to specific user profiles and apps.
10. Why might you use different Lightning Record Pages for different user profiles?
Answer: Different user profiles often require tailored views to optimize their workflows. For example:
Sales Team: Focused on key fields like opportunities and account details.
Support Team: Prioritizes case history and customer contact information. Customizing pages per profile ensures users see only relevant data, reducing confusion and improving efficiency.
Salesforce Developer Interview Questions and Answers: Customizing Record Page Components and Fields
This article combines core concepts, real-time examples, governor limits, limitations, and tricky interview questions to prepare you for Salesforce developer interviews on this topic.
1. What is the Lightning App Builder, and what are its capabilities?
Answer: The Lightning App Builder is a Salesforce tool used to customize Lightning pages. It allows developers to:
Control the structure and layout of pages.
Add or remove components.
Create dynamic pages using Dynamic Forms.
Assign pages to specific apps, profiles, and devices.
Example: A sales team might use a custom Lightning page showing only fields like "Opportunity Amount" and "Expected Close Date."
Governor Limit Consideration: Be mindful of the total number of fields displayed on a page to avoid performance issues.
2. What are Dynamic Forms, and how do they improve page customization?
Answer: Dynamic Forms enable fields and sections to be added as independent components on a Lightning Record Page, offering:
Conditional visibility based on field values.
Tailored layouts for specific user needs.
Improved page performance by displaying only relevant data.
Example: Show the "Discount" field only when the "Account Type" is set to "Preferred."
Limitation: Dynamic Forms are currently supported for custom objects only, not standard objects like Accounts or Opportunities.
3. How do you add a related list to a Lightning Record Page?
Answer: To add a related list:
Go to Object Manager → Page Layouts.
Drag the desired related list (e.g., Files) from the palette to the Related Lists section.
Save the layout.
Real-Time Example: A "Files" related list can be added to an "Energy Audit" object to display associated documents.
4. What are the steps to create and activate a custom Lightning Record Page?
Answer:
Navigate to the object via the App Launcher.
Select a record, then go to Setup → Edit Page.
Customize the layout using the Lightning App Builder.
Activate the page by assigning it to specific profiles, apps, and devices.
Save and test the page.
Tricky Question: Q: How do you handle activation for different form factors (desktop vs. phone)? A: Assign the page to both form factors during activation to ensure responsiveness across devices.
5. How do you ensure performance optimization when customizing Lightning Record Pages?
Answer:
Limit the number of fields, components, and related lists on a page.
Use Dynamic Forms to display only relevant fields.
Optimize images and custom components for mobile devices.
Governor Limit Consideration: Exceeding field or related list limits can slow down page load times.
6. How do you assign a Lightning Record Page to specific profiles or apps?
Answer:
In the Lightning App Builder, click Activation.
Choose the assignment method:
Org Default: Page is visible to all users.
App Default: Page is visible within specific apps.
App, Record Type, and Profile: Assign the page to specific apps, record types, and profiles.
Real-Time Example: Assign a custom "Energy Audit Record Page" to the Sales Profile, ensuring only sales users can access it.
7. What are Related Lists, and how do they differ from Related List - Single components?
Answer:
Related Lists: Display multiple related records in a tabular format.
Related List - Single: Displays a single related record in detail.
Limitation: The "Related List - Single" component can only display one related record at a time, limiting its use in complex layouts.
8. What are best practices for customizing record pages in Salesforce?
Answer:
User-Centric Design: Arrange components logically and minimize clutter.
Dynamic Forms: Use conditional visibility for improved user experience.
Testing: Validate page responsiveness on desktop and mobile.
Performance: Limit unnecessary fields and components to optimize load times.
Tricky Question: Q: What happens if a Lightning Record Page is assigned to a profile that doesn't use the specified app? A: The profile won't see the custom page, as app assignment also governs page visibility.
9. Can you customize the "Details" tab on a Lightning Record Page?
Answer: Yes. The "Details" tab displays fields and links for a record. Use Dynamic Forms to rearrange, add, or remove fields and sections.
Example: Move "Audit Notes" to a prominent location for Energy Audit records.
Governor Limit: Ensure field visibility logic doesn't conflict with object-level or field-level security.
10. What are some limitations of Lightning App Builder?
Answer:
Dynamic Forms: Supported only for custom objects.
Complex Relationships: Limited capability to handle many-to-many relationships.
Mobile View: Components may not always render as expected on mobile devices.
11. How do you debug issues with Lightning Record Pages?
Answer:
Check field visibility rules in Dynamic Forms.
Verify activation settings for profiles and apps.
Test the page in both desktop and mobile environments.
Use Salesforce's Lightning Debug Mode for custom components.
12. How do governor limits affect Lightning Record Page performance?
Answer:
Field Limits: Avoid exceeding 500 fields per page.
API Calls: Minimize custom components that trigger excessive API requests.
Component Count: Too many components can degrade performance.
Tricky Question: Q: How do you troubleshoot slow page load times? A: Analyze the number of fields, components, and related lists; optimize images; and check for excessive server-side calls.
13. Why use different Lightning Record Pages for various profiles?
Answer: Tailoring pages to profiles ensures users see only relevant information, improving focus and efficiency. For example:
Sales Team: Show key fields like "Opportunity Amount" and "Probability."
Support Team: Highlight case history and contact information.
Tricky Question: Q: What happens if no page is assigned to a profile? A: The default page layout will be used.
14. Can you use conditional visibility for related lists?
Answer: No. Conditional visibility is supported for fields in Dynamic Forms, not for related lists.
This comprehensive guide equips you with foundational and advanced concepts, practical examples, and tricky questions to confidently handle interviews on customizing Salesforce Lightning Record Pages.
Unit 6 - Create Custom Buttons and Links
1. What are custom buttons and links in Salesforce, and how do they enhance productivity?
Answer: Custom buttons and links allow users to integrate Salesforce data with external URLs, applications, and systems. They help users access specific pages or perform tasks efficiently, such as:
Linking to an external URL (e.g., company intranet or a specific website).
Launching custom pages or actions.
Providing quick access to related data or functionalities.
2. What are the different types of custom buttons and links?
Answer: There are three main types:
List Button: Appears on related lists on an object record page.
Detail Page Link: Appears in the Links section of an object record page.
Detail Page Button: Appears in the action menu in the highlights panel of a record page.
3. How do you create a custom List Button, and where can it be used?
Answer: To create a custom List Button:
Navigate to Setup → Object Manager → Select the object → Buttons, Links, and Actions → New Button or Link.
Name the button and select List Button as the display type.
Define the button's action using a URL or formula.
Save the button.
Add the button to a related list via Page Layouts.
Use Case Example: A List Button named "Audit Guidelines" links to a PDF with audit instructions and is added to the "Energy Audits" related list of accounts.
4. How do you create a custom Detail Page Link? Provide an example.
Answer: To create a custom Detail Page Link:
Navigate to Setup → Object Manager → Select the object → Buttons, Links, and Actions → New Button or Link.
Name the link and select Detail Page Link as the display type.
Define the link's action using a URL, optionally including merge fields.
Save the link and add it to the Custom Links section of a page layout.
Example:
A Detail Page Link named "Google This Account" performs a Google search using the account's name:
https://www.google.com/search?q={!Account.Name}
5. How do you create a custom Detail Page Button? Provide an example.
Answer: To create a custom Detail Page Button:
Navigate to Setup → Object Manager → Select the object → Buttons, Links, and Actions → New Button or Link.
Name the button and select Detail Page Button as the display type.
Define the button's action using a URL or formula with merge fields.
Save the button and add it to the Custom Buttons section of a page layout.

Example:
A Detail Page Button named "Map Location" displays the account’s location on Google Maps:
http://maps.google.com/maps?q={!Account_BillingStreet}%20{!Account_BillingCity}%20{!Account_BillingState}%20{!Account_BillingPostalCode}
6. What are merge fields, and how are they used in custom buttons and links?
Answer: Merge fields dynamically insert Salesforce data into URLs, formulas, or actions. For example:
{!Account.Name}inserts the account's name into a URL.{!Account_BillingCity}passes the account's billing city into an external query (e.g., Google Maps).
Merge fields personalize button/link behavior based on the context of the record.

7. How can you add a custom button or link to a page layout?
Answer:
Navigate to Object Manager → Select the object → Page Layouts.
Edit the desired page layout.
Drag the custom button/link to its respective section:
Custom Links for Detail Page Links.
Custom Buttons for Detail Page Buttons.
Related lists for List Buttons.
Save the layout.
8. What are some common use cases for custom buttons and links?
Answer:
List Buttons: Navigate to shared resources, such as guidelines or templates.
Detail Page Links: Perform searches or access external tools directly from record details.
Detail Page Buttons: Visualize record-related data in third-party tools (e.g., Google Maps for location).
9. What is the difference between a custom button and a custom link?
Answer:
Display Location
Action menu (highlights panel) or Related list
Links section of a record page
Action Type
Can invoke external applications or tools
Primarily navigates to URLs or resources
Appearance
Button-style UI
Hyperlink-style UI
10. What considerations should developers keep in mind when creating custom buttons and links?
Answer:
Ensure URLs or formulas include the correct merge fields to avoid errors.
Place buttons or links in intuitive locations (e.g., related lists for List Buttons).
Test buttons/links thoroughly to verify they perform the intended action.
Consider user permissions and visibility when adding them to page layouts.
Unit 7 - Empower Your Users with Quick Action
1. What are Quick Actions in Salesforce, and why are they important?
Answer: Quick Actions allow users to perform common tasks such as creating records, logging calls, sending emails, and updating data efficiently. They improve user productivity by simplifying workflows and navigation, enabling faster task completion.
2. What are the two types of Quick Actions in Salesforce?
Answer:
Object-Specific Actions:
Associated with a specific object.
Automatically link records to related objects.
Examples:
Create: Create a record tied to the current object (e.g., create a contact for an account).
Update a Record: Edit a record’s fields.
Log a Call: Record notes for calls or meetings.
Custom Actions: Use Lightning components, Visualforce pages, or canvas apps.
Send Email: Available for case records, providing a simplified email interface.
Global Actions:
Not tied to a specific object.
Can be accessed from the global actions menu on any Salesforce page.
Examples:
Log call details.
Create a record (e.g., Campaigns).
Send emails.
3. How do Object-Specific Actions differ from Global Actions?
Answer:
Object-Specific Actions:
Linked to a particular object.
Automatically associate new records with the object.
Displayed on the object’s page layout.
Global Actions:
Independent of objects.
Accessible via the global actions menu.
Use the Global Publisher Layout.
4. How do you create an Object-Specific Action?
Answer: Steps to create an Object-Specific Action:
Go to Setup → Object Manager → Select an object (e.g., Account).
Click Buttons, Links, and Actions, then New Action.
Select the action type (e.g., Create a Record).
Choose the target object (e.g., Energy Audit).
Enter the Action Label (e.g., "New Energy Audit").
Click Save.
Customize the action layout by adding or removing fields using the Action Layout Editor.
5. How do you add an Object-Specific Action to a Page Layout?
Answer:
In Object Manager, click Page Layouts for the desired object.
Select a page layout (e.g., Account Layout).
In the Salesforce Mobile and Lightning Experience Actions section:
Click Override the Global Publisher Layout if needed.
Drag the custom action (e.g., "New Energy Audit") from the Mobile & Lightning Actions palette to the section.
Save the layout.
6. How do you create a Global Action?
Answer: Steps to create a Global Action:
In Setup, enter Global Actions in the Quick Find box and select Global Actions.
Click New Action.
Choose the action type (e.g., Create a Record).
Select the target object (e.g., Campaign).
Enter the Action Label (e.g., "New Campaign").
Customize the action layout to include relevant fields (e.g., Expected Revenue).
Save the action.
7. How do you add a Global Action to the Global Actions Menu?
Answer:
In Setup, enter Publisher Layouts in the Quick Find box.
Edit the Global Layout.
Override the default global publisher layout if necessary.
Drag the new action (e.g., "New Campaign") from the Mobile & Lightning Actions palette into the Salesforce Mobile and Lightning Experience Actions section.
Save the layout.
Refresh the browser to see the action in the global actions menu.
8. What are some best practices when creating Quick Actions?
Answer:
Align actions with users’ frequent tasks to enhance efficiency.
Use meaningful labels for actions to ensure clarity.
Customize layouts to include only relevant fields.
Maintain consistency in global and object-specific action usage.
Test actions to confirm they meet business requirements.
9. Where do Email, Log a Call, New Event, and New Task actions appear on a record page?
Answer:
These actions are part of Activity Management and appear under the Activity Tab on record pages.
Standard Chatter actions like Post and Poll show up under the Chatter Tab.
10. What happens if a Page Layout is not customized for actions?
Answer: If the Salesforce Mobile and Lightning Experience Actions section isn’t customized, the page inherits actions from the Global Publisher Layout or uses Salesforce’s default actions for that object.
Tricky Internet-Based Questions
14. How can you restrict access to a custom button based on user roles?
Answer: Customize page layouts for different profiles. Assign the layout with the button to specific profiles.
15. How do you handle custom buttons in the Salesforce mobile app?
Answer: Add the button to the Salesforce Mobile and Lightning Experience Actions section of the page layout. Test compatibility in the Salesforce mobile app.
16. What are merge fields, and where are they used in custom buttons or links?
Answer:
Merge fields dynamically populate field data in URLs or formulas. For example, {!Account.Name} pulls the Account Name for the record.
17. What happens if a merge field value is null in a custom button?
Answer:
If the field value is null, the URL or action may break or show incomplete data. Use default values in formulas to handle null cases, e.g., {!IF(ISBLANK(Account.Name), "Default", Account.Name)}.
Module 6 - User Engagement
Unit 1 - Get Started with User Engagement
1. What is user engagement in Salesforce, and why is it important?
Answer: User engagement is the process of onboarding, empowering, assisting, and educating users through in-app guidance. It helps users:
Quickly adapt to new features (onboarding).
Discover and adopt new functionality.
Troubleshoot issues effectively.
Gain deeper learning to maximize productivity and innovation.
Engagement ensures users derive the most value from Salesforce applications while improving overall satisfaction.
2. What are the four key scenarios of user engagement, and can you give examples for each?
Answer: The four key user engagement scenarios are:
Onboarding: Helps users get started and highlights what's new or changed.
Example: First login into Lightning Experience or setting up a new feature.
Feature Discovery and Adoption: Drives awareness of new features and encourages best practices.
Example: A prompt encouraging users to explore a new reporting tool.
Troubleshooting Help: Provides just-in-time guidance for common tasks or issues.
Example: A tooltip explaining how to resolve a validation error on a form.
Deeper Learning: Offers detailed guidance to help users understand advanced concepts.
Example: A walkthrough explaining the nuances of Einstein Analytics.
3. What components does Salesforce provide for user engagement, and how are they classified?
Answer: Salesforce provides components that are either declarative (click-based) or programmatic (code-based). Key components include:
Welcome Mat
Resources for users upon first login.
Programmatic
Guidance Center
Contextual help menu for Trailhead and related topics.
Declarative
Prompts
Floating, targeted, or docked messages for new features or announcements.
Declarative
Popovers
Tips and best practices linked to page components.
Programmatic
Empty State
Instructions for blank or unused sections.
Programmatic
Field-Level Help
Explains the purpose of fields in tooltips.
Declarative
Setup Assistant
Centralized onboarding tasks for features or orgs.
Programmatic
Walkthrough
Hands-on interactive tours for onboarding.
Declarative
4. How do the four scenarios map to these components?
Answer:
Welcome Mat
✔️
✔️
Guidance Center
✔️
✔️
✔️
Prompts
✔️
✔️
✔️
✔️
Popovers
✔️
✔️
✔️
✔️
Empty State
✔️
✔️
✔️
Field-Level Help
✔️
✔️
Walkthrough
✔️
✔️
✔️
5. What is the difference between the push and pull methods of user engagement?
Answer:
Method
Description
Examples
Push
Automatically presents content to users without them seeking it.
Prompts, popovers, walkthroughs, empty states.
Pull
Requires users to actively seek assistance.
Tooltips (infobubbles), the Guidance Center.
A good engagement strategy combines both methods to maximize effectiveness.
6. How can developers extend user engagement beyond basic components?
Answer: Salesforce provides additional tools for extending user engagement:
Utility Bar Notes: Quick access to tools in a footer panel.
Rich Text Component: Add text and HTML to Lightning pages.
Guidance for Success on Path: Context-specific guidance for process steps.
Custom Notifications from Flows: Alerts for significant events, e.g., new support cases.
Einstein Analytics In-Dashboard Videos: Educational videos to improve dashboard usage.
These tools enhance the user experience and drive feature adoption.
7. As a developer, how would you decide which component to use for user engagement?
Answer: Key considerations include:
Scenario fit: Match the component to the engagement scenario (e.g., onboarding, troubleshooting).
Space and format: Use concise formats like tooltips for short messages and walkthroughs for detailed instructions.
Push or pull: Choose based on user behavior—use push methods for proactive guidance and pull for self-service help.
Declarative vs. programmatic: Opt for declarative solutions where possible for easier configuration and maintenance.
1. What are the key use cases for using prompts and walkthroughs in Salesforce?
Answer: Prompts and walkthroughs are ideal for:
Highlighting features that are easy to learn and use immediately.
Introducing enhancements to existing functionality.
Onboarding users to features with low adoption or providing productivity tips.
Offering short, actionable guidance without disrupting the user's workflow.
They are not suitable for:
Features with complex workflows or steep learning curves.
Features requiring extensive prerequisites or context.
Heavily personalized features.
2. How do prompts and walkthroughs differ, and when should you use each?
Answer:
Prompt: A single, small window that provides a quick message or action.
Use for short messages or to introduce a single feature.
Walkthrough: A series of connected prompts for step-by-step guidance.
Use for onboarding, multi-step procedures, or exploring multiple related features.
Examples include introducing new hires to their workspace or guiding users through a navigational overview.
3. What are the three types of prompts in Salesforce, and when should you use each?
Answer:
Floating Prompt:
A short, nonintrusive message with a call-to-action button.
Use for quick announcements or tips like pinning a favorite list view.
Can be placed in nine positions on a page (e.g., top-right, bottom-center).
Targeted Prompt:
Connected to a specific page element, showing users exactly what the message refers to.
Use to point out new or updated features tied to specific UI components.
Docked Prompt:
A persistent prompt that remains on screen as the user navigates.
Use for longer content like step-by-step instructions, embedded videos, or detailed changes.
4. What factors should you consider when designing prompts and walkthroughs?
Answer:
Audience Needs:
Users prefer actionable, relevant information without workflow interruptions.
Avoid content that feels like marketing unless tailored to their needs.
Message Complexity:
Use short messages for prompts.
Choose walkthroughs for complex, multi-step guidance.
Context:
Align guidance with user experience and ensure it enhances productivity.
5. What is a Floating Prompt, and how is it used?
Answer:
A Floating Prompt is a lightweight, nonintrusive message displayed in one of nine positions on the page.
It can include a short message, optional image, and a call-to-action button (e.g., linking to training or documentation).
Ideal for simple instructions, quick announcements, or the steps in a walkthrough.
6. How does a Targeted Prompt differ from a Floating Prompt?
Answer: A Targeted Prompt attaches to a specific page element, showing users exactly what the message refers to. Unlike a Floating Prompt, it isn’t restricted to predefined positions and provides more precise guidance tied to specific UI elements.
7. What are Docked Prompts, and when should you use them?
Answer:
A Docked Prompt stays visible as users navigate, providing persistent information.
Use cases:
Displaying step-by-step instructions or next steps.
Embedding videos or detailed content (e.g., introducing changes to the account detail page layout).
8. How do you decide between using a prompt and a walkthrough for feature adoption?
Answer:
Use a prompt for a short, single action or update (e.g., announcing a new feature).
Use a walkthrough when:
Multiple steps are needed.
The goal is to guide users through complex workflows or related features.
Onboarding new hires or providing an in-depth feature overview.
9. What are some tools provided by Salesforce to help create effective in-app guidance?
Answer: Salesforce provides managed packages like:
In-App Guidance: Boost Sales User Productivity.
In-App Guidance: Boost Service User Productivity.
These packages include pre-built examples and templates for prompts and walkthroughs. To use them, the Sales or Service Console app must be installed in the org.
10. What are some best practices for implementing in-app guidance in Salesforce?
Answer:
Keep prompts short and actionable.
Use walkthroughs for multi-step tasks or onboarding scenarios.
Tailor messages to your audience’s needs and avoid interrupting workflows unnecessarily.
Leverage rich content like videos or links in docked prompts for detailed guidance.
1. What is In-App Guidance in Salesforce, and why is it useful?
Answer: In-App Guidance in Salesforce provides contextual, step-by-step instructions to users within the Salesforce interface. It helps improve user engagement by offering targeted tips, walkthroughs, or prompts to guide users through processes, feature updates, or tasks within the app. It is useful for onboarding, training, and providing real-time assistance, ensuring users understand how to use Salesforce effectively.
2. How do you create a targeted prompt in Salesforce Lightning Experience?
Answer: To create a targeted prompt:
Navigate to Setup → In-App Guidance in the Quick Find box.
Click Add to open the In-App Guidance Builder.
Select Single Prompt, then click Next.
Choose Targeted Prompt for the Prompt Type.
Define the prompt's Title and Body, such as "Get Help Anywhere in the Console App."
Customize the action button label (e.g., "Got It") and the URL for additional resources (e.g., Salesforce Help).
Set visibility options like schedule, frequency, and end date.
Save the prompt.
3. What is the difference between a floating prompt and a docked prompt in Salesforce?
Answer:
Floating Prompt: It appears as a floating overlay that can be moved around the screen. It’s typically used for announcements or key messages.
Docked Prompt: It stays anchored at the bottom or top of the page and does not move, providing consistent guidance across sessions.
4. How do you add a prompt to a specific app (e.g., Sales Console)?
Answer:
In the In-App Guidance Builder, select the Sales Console app from the App Launcher.
Click Add in the builder bar.
Configure the prompt’s details (e.g., targeted prompt type).
Choose where the prompt should appear, such as on the Sales Console app’s homepage.
Customize settings like the action button’s URL, title, and frequency of display.
Save and exit.
5. How do you customize the appearance and behavior of a prompt in Salesforce?
Answer: You can customize the appearance and behavior of a prompt by:
Choosing a custom theme color for the prompt’s background and text.
Setting the title, body text, and action button labels (e.g., "Got It" and "Tell Me More").
Defining the URL for the action button, which can lead users to help articles or additional resources.
Configuring the schedule (when the prompt should appear) and frequency (how often it shows up).
Setting end dates for the prompt’s lifecycle.
6. How can you track user engagement for prompts and walkthroughs?
Answer: You can track user engagement by monitoring the following metrics in the In-App Guidance page:
Views: The number of unique users who have seen the prompt or walkthrough.
Completes: The percentage of users who clicked the action button or completed the walkthrough.
To gather detailed insights, you can set up custom reports using the Prompt Actions object, adding fields like Step Number, Last Display Date, and User Name.
7. What are some key considerations when creating prompts for Salesforce apps or Experience Cloud sites?
Answer: When creating prompts for apps or sites:
Ensure the prompts are contextual to the app’s functionality (e.g., Sales Console or Service Console).
Use clear and concise messaging in the prompt body and action button text.
Customize the prompt's visibility settings based on user roles or profiles if necessary.
For Experience Cloud sites, prompts should be added according to the templates supported by the site (e.g., Aura templates).
8. How can you use images in prompts, and what steps are required to allow image URLs in Salesforce?
Answer: To use images in prompts:
Upload the image directly into the prompt or use an external image URL.
To allow external image URLs, add the URL to the list of Trusted URLs in Salesforce:
Navigate to Setup → Trusted URLs.
Add a new trusted URL for help.salesforce.com.
Verify that img-src is enabled in the CSP Directives to allow images to load properly.
9. How can you use targeted prompts for specific user profiles or permission sets?
Answer: When setting up a prompt, you can configure profile and permission set restrictions to ensure the prompt appears only to users with specific access rights. However, in this case, the example suggests leaving profile and permission restrictions as None, making the prompt visible to all users. To target specific users, select the appropriate profiles or permission sets under the prompt’s configuration settings.
10. What is the process to install the Prompts for Sales and Service apps in Salesforce Trailhead Playground?
Answer:
Launch the Trailhead Playground and navigate to the App Launcher.
Search for Playground Starter and select it if available.
Open the Install a Package tab and install the Prompts for Sales app using the Package ID: 04t3k000000bHJEAA2.
Repeat the process to install the Prompts for Service app using Package ID: 04t6g000002RSR7AAO.
Once installed, verify the successful installation by checking the In-App Guidance section in Setup.
Unit 4 - Design a User Engagement Journey
1. What is the "aha moment" in user engagement, and why is it important?
Answer: The "aha moment" is the moment when a user first realizes the value of a product or feature. It's a point where the user understands how the product can make their job easier, improving their experience and efficiency. This moment is critical because it encourages users to continue using the product and increases adoption.
2. How can you design a user engagement journey in Salesforce?
Answer: A user engagement journey can be designed in four phases:
Onboarding: Welcome users and help them get started.
Feature Adoption and Discovery: Introduce new features and encourage their usage.
Help and Troubleshooting: Provide relevant, minimally disruptive support when users encounter issues.
Deeper Learning: Offer guidance for users to master more complex tasks and features.
These phases are iterative, not linear, as users may cycle through them at various stages of product usage.
3. How do you determine the most helpful information to provide at each stage of the user journey?
Answer: To determine helpful information at each stage:
Identify top use cases that the user is most likely to engage with.
Highlight important changes in features or updates to keep users informed.
Tailor content based on user role, familiarity, and motivation. For example, beginners might need basic tips, while experienced users may require advanced tutorials.
4. What is the MAP framework in user engagement, and how does it help create effective content?
Answer: MAP stands for Message, Audience, and Purpose.
Message: What you want to communicate to the user.
Audience: Who you're targeting (e.g., all users, sales users, new users).
Purpose: The reason for delivering the message (e.g., onboarding, feature adoption, troubleshooting). This framework helps ensure that content is relevant, targeted, and serves a clear goal, ultimately enhancing user engagement.
5. Can you give an example of how to use the MAP framework?
Answer: Example:
Message: "Learn how to pin, switch, and customize list views with just a few clicks."
Audience: All users
Purpose: Teach basic skills for customizing list views.
This helps users understand the specific action they need to take and highlights the relevance of the feature for their workflow.
6. What are the FACE principles for writing effective user engagement content?
Answer: The FACE principles stand for:
Friendly: Keep the tone engaging and approachable.
Accurate: Ensure the content is correct to build trust.
Concise: Keep the message short and to the point.
Educational: Teach users how to use the feature to improve their productivity.
Following these principles helps create content that is both user-friendly and valuable.
7. What types of calls to action (CTAs) might you use in user engagement content?
Answer: CTAs vary depending on the content:
Acknowledgment: A simple “Got It” or “OK” when informing users of upcoming changes.
Action-oriented: Encouraging users to try a feature, watch a tutorial, or complete a setup task (e.g., "Try Path and Kanban now" or "Complete your profile").
CTAs should be relevant and not interrupt the user’s workflow unnecessarily.
8. How do you storyboard a user engagement journey, and why is it important?
Answer: Storyboarding is the process of visually mapping out the steps in a user engagement journey, using wireframes and arrows to represent each stage. It helps visualize the flow of user interactions and ensures that the pieces fit together cohesively. Storyboarding makes it easier to plan and execute the user engagement strategy effectively.
9. What are some best practices for writing user engagement content for onboarding?
Answer: For onboarding:
Start with a friendly, welcoming message that makes users feel comfortable.
Highlight key features that will make their tasks easier, such as search, favorites, and list view customization.
Offer quickstart guides and tips to help them become familiar with the most important features immediately.
The goal is to help users get up and running quickly without feeling overwhelmed.
10. How does Salesforce help developers implement user engagement strategies?
Answer: Salesforce offers various tools like In-App Guidance, Path, Kanban, and Walkthroughs to help developers create engaging, context-sensitive content. These tools can be used to guide users through onboarding, feature adoption, and troubleshooting processes, ensuring users receive relevant, timely support. Additionally, developers can storyboard and tailor content to meet user needs effectively.
11. How can you handle feature adoption and discovery in the user engagement journey?
Answer: Feature adoption can be promoted by:
Showcasing new features through prompts or tooltips, encouraging users to explore.
Offering short, helpful tutorials or videos to explain new functionalities.
Highlighting value in the messaging, such as how the new feature improves efficiency or simplifies tasks.
The goal is to excite users about new features and show them how it directly benefits their work.
What Is a Report?
In its simplest form, a report is a list of records (like opportunities or accounts) that meet the criteria you define. But reports are much more than simple lists. To get the data you need, you can filter, group, and do math on records. You can even display them graphically in a chart!
What Is a Report Type?
A report type is like a template. Choosing the right report type is important in building a report, because when you choose a report type, you’re selecting the records and fields that are available for your report. Each report type has a primary object and can optionally include related objects. Salesforce offers a variety of standard report types based on single objects, like Accounts, Leads, and Products, and with related objects, like Opportunities with Projects and Campaigns with Contacts. But sometimes a standard report type doesn’t provide all the objects and fields that you need. That’s where custom report types come in.
What Is a Dashboard?
A dashboard is a visual display of key metrics and trends for records in your org. Each dashboard widget is based on a single source report. You can use the same or different source reports for the various widgets in a dashboard (for example, use the same report in a bar chart and pie chart). By adding multiple dashboard widgets to a single dashboard page, you can create a powerful visual display of data on a common theme, such as sales performance or customer support.
Dynamic dashboards are dashboards for which the running user is always the logged-in user.
Organize Your Reports and Dashboards
Each report or dashboard is stored in a report or dashboard folder. Folders determine how the reports and dashboards are organized and who can access them. Folders can be public, hidden, or shared. You control who has access to the contents of the folder based on roles, permissions, public groups, territories, and license types. You can make a folder available to your entire organization, or make it private so that only the owner has access.
Create a report -
In your Trailhead Playground, click the App Launcher
 App launcher icon and go to Reports.
Click New Report.
Select the Accounts report type.
Click Start Report.
Click Save.
Save the report as Direct Customer Accounts and accept the auto-generated unique name.
Click Save.
The Outline tab lets you group the report by rows (summary report) or rows and columns (matrix report). We explore these options in the Format Reports unit.
The Filters tab lets you apply standard filters and add field filters, filter logic, cross-filters, and row limit filters. The number to the right of the tab name indicates the number of filtering restrictions that are currently applied to the report. We explore filtering options in the Filter Your Report unit.
Salesforce Developer Interview Questions and Answers: Lightning Reports and Dashboards
This comprehensive guide provides key questions and answers about Lightning Reports and Dashboards in Salesforce, suitable for interview preparation. It includes governor limits, limitations, real-world examples, and some tricky questions to demonstrate in-depth understanding.
1. What is a report in Salesforce? How is it used?
Answer: A report in Salesforce is a list of records meeting specified criteria. It allows users to filter, group, and perform calculations on records. Reports are stored in folders, which control access and visibility.
Example Use Case:
To find the top-selling products, create a report on "Opportunities with Products" filtered for Closed Won opportunities, group by product family, and display results as a bar chart.
2. What is the difference between a report, a dashboard, and a report type?
Answer:
Report: Displays filtered records (e.g., Opportunities grouped by product family).
Dashboard: A visual representation of key metrics using widgets based on reports (e.g., a bar chart of sales performance).
Report Type: A template that defines which objects and fields are available for building reports.
Example:
Report: List of opportunities grouped by sales stage.
Dashboard: A pie chart showing the proportion of each sales stage.
Report Type: “Opportunities with Products.”
3. What are report types in Salesforce? How are custom report types useful?
Answer:
Standard Report Types: Predefined templates based on single or related objects (e.g., Accounts, Leads).
Custom Report Types: User-defined templates that include specific objects and fields not available in standard types.
Example: A custom report type "Leads with Activities" can display only leads with associated activities, which isn’t possible with standard report types.
4. What is a dashboard, and how does it work?
Answer: A dashboard is a visual representation of reports using widgets like bar charts, pie charts, or gauges. Each widget is linked to a source report, and dashboards are stored in folders that control their accessibility.
Static Dashboards: Use a specific running user’s permissions to display data.
Dynamic Dashboards: Display data based on the logged-in user’s access level.
Example: A sales manager’s dashboard shows her team’s performance, but dynamic dashboards allow each team member to see only their data.
5. What are some limitations of reports and dashboards in Salesforce?
Answer:
A report can display a maximum of 2,000 rows, though exporting allows more rows.
Dashboards are limited to 20 components per dashboard.
Dynamic dashboards are limited to 5 per Enterprise Edition org and 10 per Unlimited Edition org.
The underlying data for dashboards must be accessible by the running user.
6. What are governor limits related to reports and dashboards?
Answer: Governor limits ensure efficient resource usage in Salesforce.
Report Execution Time: Reports must execute within the time limits; excessively complex filters can cause timeouts.
Dashboard Refresh Frequency: Dashboards can’t refresh more than once per hour or per request for manual refresh.
Row Limit: Reports display up to 2,000 rows in UI.
7. How do you organize and manage report and dashboard folders?
Answer: Folders help manage access to reports and dashboards.
Public: Accessible by everyone.
Private: Only the owner can access.
Shared: Shared with specific roles, permissions, or groups.
Example: A sales performance dashboard can be shared only with the sales team by restricting folder access.
8. What are some real-world examples of using reports and dashboards?
Answer:
Top Sellers Report: Filter opportunities for Closed Won status and group by product family.
Customer Satisfaction Dashboard: Use case reports to create charts showing resolution times and satisfaction ratings.
Sales Pipeline Dashboard: Display opportunities grouped by stage using bar and funnel charts.
9. What is the purpose of dynamic dashboards, and when should you use them?
Answer: Dynamic dashboards display data based on the logged-in user’s permissions, ensuring each user sees data they’re authorized to access.
Use Case: A sales leaderboard for a team where each member sees only their performance without viewing other teams’ data.
10. Tricky or Advanced Questions
Q: What happens if a user lacks access to a report used in a dashboard? A: They won’t see the related widget in the dashboard. The data source must match the user’s permissions.
Q: Can you use custom fields in a report? A: Yes, custom fields are available in reports if included in the report type.
Q: How would you optimize reports for performance? A:
Use indexed fields for filtering.
Limit the number of filters and displayed records.
Use summary or matrix formats for complex grouping.
11. Bonus Knowledge:
Cross Filters: Allow filtering records by related object conditions (e.g., accounts without activities).
Bucket Fields: Group field values without creating custom fields (e.g., categorize revenue ranges).
Joined Reports: Combine data from multiple report types (e.g., accounts and opportunities in one report).
Key Tips for Salesforce Interviews on Reports and Dashboards:
Understand real-world scenarios and how to translate business questions into reports or dashboards.
Know the governor limits and best practices for optimizing reports.
Be ready to explain dynamic dashboards, report folders, and custom report types with examples.
Be prepared for questions requiring you to troubleshoot or optimize existing reports/dashboards.
UNIT 3 - Filter Your Report
What is a filter ?
When you’re using the report builder to ask questions about your data, filters allow you to get more specific.
Types of filers -
Standard Filter - Most objects include standard filters. Different objects have different standard filters, but most include the standard filters Show Me and Created Date. Show Me filters the object around common groupings (like My accounts or All accounts). Date Field filters by a field (such as Created Date or Last Activity) and a date range (such as All Time or Last Month).
Field Filter - Field filters are available for reports, list views, workflow rules, and other areas of the application. For each filter, set the field, operator, and value. To add a field filter, use the search bar in the Filters tab or drag the field from the Fields list.
Filter Logic - Add Boolean conditions to control how field filters are evaluated. You must add at least 1 field filter before applying filter logic. Filter logic applies to field filters, but not standard filters.
Cross Filter - Filter a report by a child object using WITH or WITHOUT conditions. Add subfilters to further filter by fields on the child object. For example, if you have a cross filter of Accounts with Opportunities, click Add Opportunity Filter and create the Opportunity Name equals ACME subfilter to include only those opportunities.
Row Limit - For ungrouped (tabular) reports, select the maximum number of rows to display, choose a field to sort by, and specify the sort order. You can use a tabular report as the source report for a dashboard table or chart component if you limit the number of rows it returns.
Salesforce Developer Interview: Comprehensive Q&A on Report Filtering
This article compiles essential questions for Salesforce developers based on report filtering concepts, limitations, governor rules, and real-world use cases. Each question includes straightforward answers, insightful examples, and tricky or advanced topics to help you excel in interviews.
1. What is the purpose of filters in Salesforce reports?
Answer: Filters help refine data in Salesforce reports to show specific subsets of information. They allow users to focus on relevant records without modifying the underlying database.
2. What are the different types of filters available in Salesforce reports? Provide examples.
Answer:
Standard Filters: Example:
Show Me(e.g., My Accounts or All Accounts),Created Date. Use Case: View records created last month.Field Filters: Example: Filter by fields like
Type = Customer - Direct. Use Case: Show accounts where Type is Customer - Direct.Cross Filters: Example: Accounts with Opportunities or without Activities. Use Case: Identify accounts with early-stage opportunities. Limitations: Cross filters can slow performance when dealing with large datasets.
Filter Logic: Example:
(1 OR 2) AND 3to combine multiple conditions. Use Case: Opportunities with a probability > 50% OR amount > $100,000.Row Limit Filters: Example: Show the top 10 records sorted by Amount. Use Case: Dashboard components.
3. What is filter logic in Salesforce, and how is it used?
Answer:
Filter logic uses Boolean operators (AND, OR, NOT) to combine or exclude filter conditions.
Example:
Field Filters:
Amount > 100000Probability > 50%
Filter Logic:
(1 OR 2)Result: Opportunities meeting either condition.
Tricky Question:
What happens if you use NOT in complex logic, e.g., (1 OR 2) AND NOT 3?
Answer: It excludes records matching filter 3, ensuring only 1 or 2 conditions are included.
4. What are Cross Filters? Explain with examples.
Answer: Cross Filters allow filtering by related child objects without using formulas or code.
Examples:
Accounts with Opportunities Subfilter:
Stage IN (Prospecting, Qualification). Use Case: Identify accounts with opportunities in the early sales cycle.Contacts without Accounts Use Case: Detect orphan contacts to clean data.
Limitations:
Cross filters can't be used for parent objects with millions of child records due to performance degradation.
5. How do you lock a filter on a report?
Answer: Locking filters prevents users from modifying filter values in the report run page.
Steps:
Set a filter in the report (e.g.,
Lead Source = Partner).Check the Locked checkbox.
Apply and save the report.
Use Case: Restrict access to sensitive data while sharing reports.
6. What are the limitations or performance considerations when applying filters?
Answer:
Not Equals Operator (
!=): May slow reports or cause timeouts due to extensive record comparisons.Cross Filters: Performance degrades with large datasets or complex relationships.
Row Limit: Only applies to Tabular Reports, not Summary or Matrix reports.
Governor Limits: Maximum of 20,000 rows for standard report execution.
Tricky Question:
How do you optimize a report with != or NOT filters?
Answer: Use indexed fields or rewrite filters to include matching conditions instead of exclusions.
7. Explain a real-world scenario using Cross Filters and Subfilters.
Scenario: A sales manager wants to follow up on opportunities stuck in early stages.
Solution:
Create a report on Accounts with Opportunities.
Add a Cross Filter:
Opportunities with Stage = (Prospecting, Qualification).Apply date ranges or amount filters to refine results.
8. What is the importance of row limit filters?
Answer: Row limit filters are critical for tabular reports used in dashboards. They enable you to limit the number of records displayed and define sorting rules.
Example: Show the top 5 opportunities by amount for a dashboard table.
9. How can Boolean filter logic (e.g., (1 AND 2) OR 3) impact report performance?
Answer: Complex logic evaluates multiple conditions and can slow report execution, especially with large datasets or unindexed fields.
Best Practices:
Use indexed fields for filters.
Avoid deeply nested conditions.
10. Governor Limits and Best Practices for Reports
Answer:
Governor Limits:
Maximum of 3 Cross Filters per report.
Maximum of 5 Subfilters per Cross Filter.
20,000 rows displayed per standard report.
Best Practices:
Use indexed fields for better performance.
Avoid
!=orNOToperators.Limit filters to required data to prevent timeouts.
Tricky Question: How do governor limits affect dashboard data sources? Answer: If the source report exceeds 20,000 rows or uses unsupported filters, the dashboard won't display data.
11. Advanced Filters: What is a use case for combining standard filters and filter logic?
Answer: Use Case: Find opportunities for Erin’s team where:
Probability > 50%.
Amount > $50,000.
Not closed in the last 30 days.
Solution:
Apply Field Filters:
Probability > 50%.Amount > 50000.Close Date != Last 30 Days.
Use Filter Logic:
(1 OR 2) AND NOT 3.
12. Common Mistakes and How to Avoid Them
Answer:
Using Too Many Filters: Simplify filters for clarity and performance.
Confusing Filter Logic: Test logic on small datasets to ensure accuracy.
Ignoring Limitations: Be mindful of row limits and Cross Filter constraints.
Tricky Question: How do you debug a report that shows incorrect data due to filters? Answer: Check the filter order, logic syntax, and validate each condition individually.
This compilation provides comprehensive knowledge on filtering Salesforce reports, ensuring you're well-prepared for a developer interview.
UNIT 4 - Format Your Report
There are three report formats available: Tabular, Summary, and Matrix. Tabular is the default format.
Tabular
Make a list
![]() *
*
![]()
Summary
Group and summarize
![]()
![]()
![]()
![]()
Matrix
Group and summarize, by row and column
![]()
![]()
![]()
![]()
* Row limit required. Learn more here.
** Bucket fields and formulas are not covered in this module.
Tabular Report -
Tabular reports are the simplest and fastest way to look at your data. Similar to a spreadsheet, they consist simply of an ordered set of fields in columns, with each matching record listed in a row. They're often best used for tasks like generating a mailing list.
On Reports, click New Report, choose the ‘Opportunities’ report type, and click Start Report.
Click Filters, then apply the following filters: 1) For the Show Me standard filter, select All opportunities and click Done. 2) For the Opportunity Status standard filter, select Open and click Apply. 3) For the date standard filter, select Created Date and All Time for the range and click Apply.
The following columns should already be included in your report: Opportunity Name, Type, Lead Source, Amount, Close Date, Next Step, Stage, Probability (%), Fiscal Period, Age, Created Date, Opportunity Owner, Owner Role, Account Name.
Click Save.
Name your report Open Opportunities This Year.
Enter a description and save the report in the Public Reports folder.
Click Run.

Summary Report -
Summary reports are similar to tabular reports, but also allow you to group rows of data, view subtotals, and create charts. Summary reports give us many more options for organizing the data, and are great for use in dashboards.
From the Reports tab, click New Report, select the ‘Customer Support Reports’ category, choose the ‘Cases’ report type, and click Start Report.
Click Filters, then apply these standard filters: 1) For Show Me, select All Cases and click Apply. 2) For Date Field, select Opened Date and All Time for the range. Then click Apply.
From the Add filter picklist, apply a field filter for cases where Closed equals True. 1) Search for and select Closed. 2) From the dropdown list, select True and click Apply.
Verify that these columns appear in your report: Case Owner, Subject, Date/Time Opened, Age, Open, Closed, and Account Name. If necessary, add them.
To make this report a summary report, you need to group rows. To group rows, first click Outline.
Under GROUP ROWS, from the Add group picklist, select Priority.
To see just the totals for each priority level, turn off Detail Rows at the bottom of the preview page.
Save the report as Closed Cases for All Time, and accept the auto-generated unique name.
Enter a description, choose the Public Reports folder, and click Save.
Click Run. The report should look something like this: Example of summary report.

Matrix Report -
Matrix reports allow you to group records both by row and by column. These reports are the most time-consuming to set up, but they also provide the most detailed view of your data.
On the Reports tab, click New Report, choose the ‘Opportunities’ report type, and click Start Report.
Click Filters, then apply these standard filters:
For the Show Me standard filter. 1) select All Opportunities and click Done. 2) For the Opportunity Status standard filter, select Closed Won and click Apply. 3) For the Date Field standard filter, select Close Date. For Range, select All Time. Click Apply. For the fastest results, always set the smallest date range you can. If your report has to sift through a great many dates, it can take longer to show the information you’ve asked for.
To summarize the report by Sum of Amount, click the
 dropdown arrow on the Amount column. Then, click Summarize and select Sum.
 To change the report format to matrix, first group rows by Close Month and columns by type. To start grouping, click Outline. 1) Under GROUP ROWS, from the Add group picklist, select Close Month. 2) Under GROUP COLUMNS, from the Add group picklist, select Type.
You may want to hide the report details when viewing a matrix report. Matrix reports are usually easiest to consume with details hidden. To hide the report details, turn off Detail Rows.
Save your report as Opportunities by Sum of Amount and accept the auto-generated unique name.
Click Run Report.

Salesforce Developer Interview: Questions and Answers on Report Formats
Basic Concepts and Use Cases
What are the report formats available in Salesforce, and what are their primary use cases? Answer:
Tabular Reports: Simplest format, resembles a spreadsheet. Used to generate lists like mailing lists.
Summary Reports: Allows grouping of rows, viewing subtotals, and adding charts. Best for dashboards and data organization.
Matrix Reports: Groups data by rows and columns, providing detailed views. Ideal for revenue trends or at-a-glance comparisons.
Tabular Reports
When should you use a Tabular Report? Answer: Use Tabular Reports for simple data views, such as creating a list of all open opportunities or generating mailing lists.
What are the limitations of Tabular Reports? Answer:
Cannot create groupings or subtotals.
To use in dashboards, must have a row limit.
Limited analytical capabilities compared to other formats.
Real-World Example: A sales rep wants a list of all leads created in the last 30 days to follow up. A Tabular Report fits this need perfectly.
Summary Reports
What distinguishes a Summary Report from a Tabular Report? Answer:
Allows grouping of rows.
Displays subtotals.
Suitable for use in dashboards with charts.
How do you create a Summary Report in Salesforce? Answer:
Create a new report.
Apply filters for the desired data set.
Group rows using fields like priority or owner.
Optionally, toggle detail rows to show/hide individual records.
Save and run the report.
What are the governor limits associated with Summary Reports? Answer:
Up to 2,000 rows of data can be displayed. Use grouping to summarize larger datasets effectively.
Reports cannot display more than 255 columns.
Real-World Example: The COO wants to see the number of customer cases by priority. A Summary Report grouped by Priority fulfills this requirement.
Matrix Reports
What are Matrix Reports, and when should you use them? Answer:
Matrix Reports group data by rows and columns for a detailed and comparative view.
Use them for complex datasets, like tracking sales by month and product category.
How do you create a Matrix Report in Salesforce? Answer:
Create a new report.
Apply filters (e.g., Closed Won opportunities).
Group rows (e.g., by Close Month) and columns (e.g., by Opportunity Type).
Summarize fields, such as the sum of amounts.
Save and run the report.
Limitations of Matrix Reports:
More time-consuming to set up.
Harder to interpret if too much data is included.
Performance may degrade with large datasets.
Real-World Example: A CEO wants to analyze monthly revenue trends by product type. A Matrix Report provides the necessary overview.
Advanced Topics and Tricky Questions
Can you use formulas in Salesforce Reports? If so, which formats support them? Answer: Yes, Salesforce supports formulas in reports.
Supported Formats: Summary and Matrix Reports.
Limitations: Not available in Tabular Reports.
What are Bucket Fields in Salesforce Reports? Answer: Bucket Fields allow you to categorize report data without creating a formula or custom field.
Example: Group cases into buckets like "High," "Medium," and "Low Priority."
What are Cross-Object Formulas, and which report formats support them? Answer: Cross-Object Formulas allow calculations using fields from related objects.
Supported Formats: Summary and Matrix Reports.
What are governor limits for Salesforce Reports? Answer:
A single report can include up to 2,000 rows of data.
Up to 5,000 reports can be created in an org.
Reports cannot exceed 10 cross-filters and 50 filter logic statements.
Tricky Question: "How would you optimize a report running slowly due to a large dataset?" Answer:
Use filters to limit the dataset.
Reduce the date range.
Group data and toggle off detail rows.
Avoid overly complex cross-filters or formulas.
Practical Challenges
How would you handle a scenario where a Summary Report needs to be displayed as a dashboard chart? Answer:
Ensure the report includes grouped data.
Add a chart in the report builder.
Save the report to a folder accessible to the dashboard creator.
Use the report as a source for a dashboard component.
How would you explain the difference between Summary and Matrix Reports to a non-technical stakeholder? Answer:
Summary Reports provide subtotals and are great for summarizing data in rows.
Matrix Reports show comparisons using both rows and columns for detailed insights.
Key Takeaways for Interview Preparation
Be familiar with report formats and their use cases.
Understand governor limits and how to optimize reports for performance.
Highlight real-world applications during discussions.
Be prepared to answer optimization or troubleshooting scenarios for reports.
This article equips you with foundational and advanced knowledge to ace Salesforce developer interview questions related to reporting.
1. What is the difference between report charts and dashboards in Salesforce?
Answer:
Report Charts are single charts added to a report to visually represent the data within that report. The chart is displayed at the top of the report for easy analysis alongside the report results.
Dashboards are a collection of multiple reports and widgets displayed on a single page. Dashboards allow you to visualize data from different sources, including charts, metrics, gauges, and tables, and display them in a more comprehensive layout.
2. How do you create a dashboard in Salesforce?
Answer: To create a dashboard:
Navigate to the Dashboards tab and click New Dashboard.
Name the dashboard, add a description (optional), and click Create.
Add a widget by clicking + Widget, then choose the type of content (chart, table, metric, etc.).
Select the Source Report for the widget, customize the widget settings, and position it on the dashboard layout.
Save the dashboard once all widgets are added and configured.
3. What types of widgets are available in the Salesforce Dashboard Builder, and when would you use them?
Answer:
Charts (Bar, Line, Donut, Funnel, etc.): Use when you need to display data graphically. Each chart type serves a different purpose (e.g., funnel charts for sales stages, donut charts for proportional data).
Gauge: Use for displaying a single value within a range (e.g., total sales against a goal).
Metric: Use for showing one key metric or value (e.g., total revenue).
Table: Use for displaying data in tabular format (e.g., list of leads, opportunities).
Legacy Table: Older table format for historical data.
4. Can you create a dynamic dashboard in Salesforce? What are its benefits?
Answer: Yes, you can create dynamic dashboards in Salesforce. A dynamic dashboard allows multiple users to view the same dashboard, but the data they see is tailored based on their security settings and role hierarchy. For example, a sales manager might see data for only the reps they manage, while the VP sees data for the entire team. Benefits:
Reduces the need for multiple dashboards for different users.
Ensures that users see data relevant to their role without needing to create separate dashboards for each user.
Can be customized to show data based on the "viewer's" role or security settings.
5. How do you set up a dynamic dashboard in Salesforce?
Answer: To set up a dynamic dashboard:
Create or edit an existing dashboard.
In the Edit Dashboard Properties, under View Dashboard As, select The dashboard viewer.
Optionally, check the box to allow dashboard viewers to choose whose data they see.
Save the dashboard and the corresponding source reports in shared folders, ensuring the intended audience has access to them.
6. What are the limitations of dynamic dashboards in Salesforce?
Answer:
Dynamic dashboards cannot be stored in private folders.
You must configure the dashboard viewer to ensure the data is displayed according to the user's role and permissions.
Not all users may have access to certain data, depending on sharing settings and role hierarchies.
7. What is the process for adding a chart to a report in Salesforce?
Answer: To add a chart to a report:
Open the report (e.g., Leads by Lead Source).
If no chart is present, click the Add Chart button.
Customize the chart type, such as bar, line, or donut, based on the data you want to visualize.
You can show or hide the chart by clicking the chart icon.
8. What is the use of a widget in a Salesforce dashboard, and how do you add one?
Answer: A widget is a component on a dashboard that displays data from a source report. Widgets can be charts, tables, metrics, or gauges. To add a widget:
In the Dashboard Builder, click + Widget.
Select the widget type (chart, metric, etc.), then choose the source report for the data.
Customize the widget (title, subtitle, size), and position it on the dashboard layout.
Save the changes and complete the dashboard.
9. Can you explain how to resize and reposition widgets in the Salesforce Dashboard Builder?
Answer:
After adding a widget, you can resize it by clicking on the widget and dragging its corners or sides.
To reposition a widget, click and drag it to the desired location within the dashboard layout.
The layout is responsive, meaning widgets of various sizes can be placed in different grid configurations for a custom look.
10. How does the Dashboard Builder support different data visualization needs in Salesforce?
Answer: The Dashboard Builder provides flexibility to visualize data through various widgets and chart types. Users can choose from bar charts, line charts, gauges, metrics, and tables to display their data in ways that are easy to interpret.
Charts are great for visualizing trends and patterns.
Gauges show progress toward goals.
Metrics display single key values (e.g., total sales).
Tables allow users to view detailed records in a tabular form. This versatility enables users to choose the best visualization method for their data, ensuring that it’s easy to understand and actionable.
Last updated